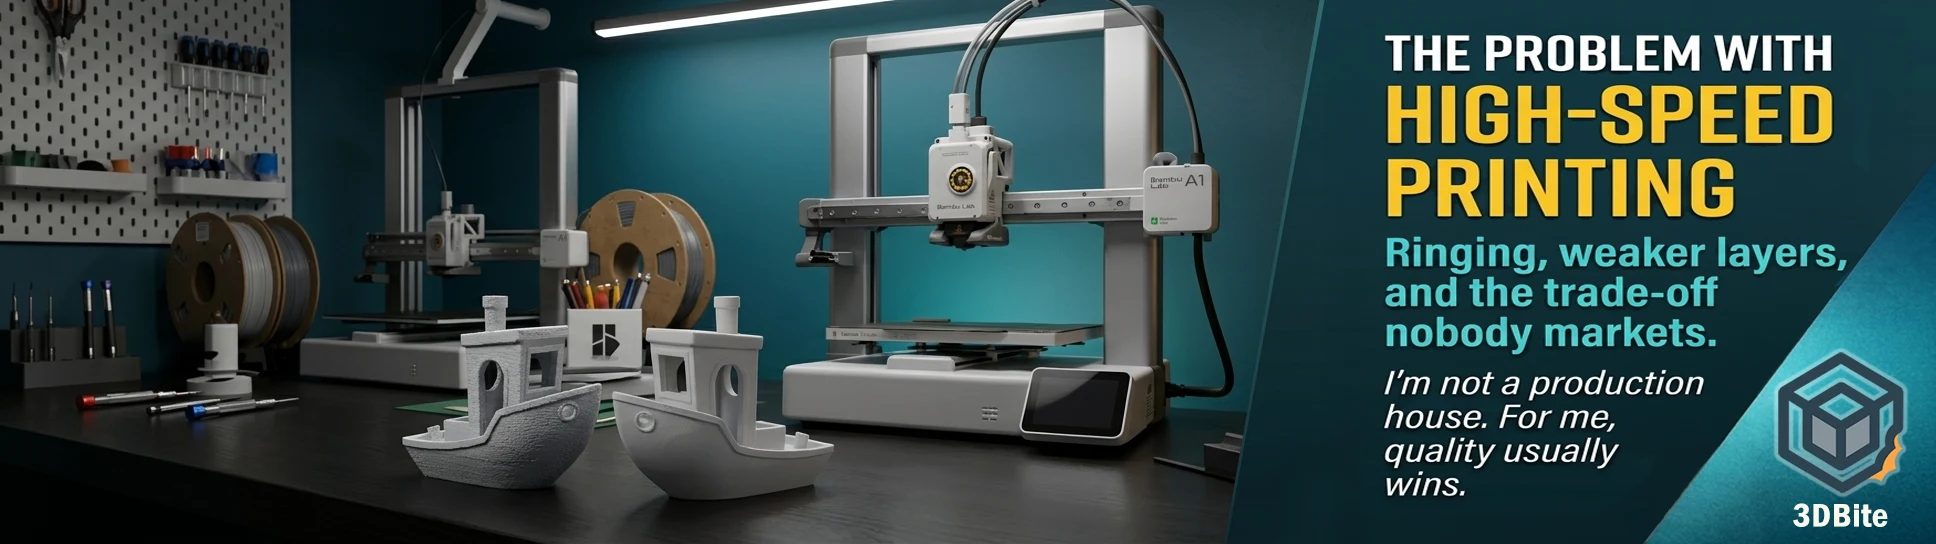
Spec sheets and marketing copy have spent the last few years locked in an arms race over a single number. 500mm/s. 20,000mm/s² acceleration. Benchy in under three minutes. Every printer launch since the X1 Carbon has led with a faster headline figure than the one before it, and the community has, by and large, gone along with the framing that faster is simply better. I am not convinced that framing holds up once you actually print things rather than benchmark them, and this post is the case for why.
I am not a production house. I am not running a print farm fulfilling hundreds of identical orders a week, where shaving thirty seconds off a job multiplies into a meaningful daily output gain. I am a hobbyist printing for myself, for gifts, for this site, and for the occasional office sweepstake. For that use case, quality matters more than speed in the overwhelming majority of jobs I run, and I think a meaningful slice of the hobbyist community printing on machines like the A1 and the A2L is in exactly the same position, whether or not they have stopped to think about it explicitly.
Why high speed printing is hard, physically
The marketing number is the top speed the toolhead can travel in a straight line. What the marketing number does not communicate is what happens at every corner, every direction change, every transition from outer wall to infill — which is to say, at almost every point on almost every real model, because real models are not straight lines. When the printhead is accelerating or decelerating, especially at high velocities, it gains inertia, causing parts to vibrate or swing, and that energy is transmitted into the printing surface as waves. This is not a software bug or a calibration oversight. It is basic Newtonian physics acting on a toolhead that has mass and a frame that has some amount of flex, however small.
The print speed figure that gets the headline is the cruise speed on a long straight move. The actual limiting factor for quality at high speed is what happens during acceleration, deceleration, and direction change — and a model dense with detail, text, small features, and corners spends a disproportionate amount of its time in exactly those transition states rather than cruising at the quoted top speed. A Benchy under three minutes is achievable because a Benchy is a relatively simple, well-understood geometry that print farms and reviewers have spent years optimising specifically for speed runs. A detailed multi-part figure, a model with fine text, or anything with the kind of intricate surface detail that this site’s projects tend to feature is a very different proposition.
Ringing and ghosting: the most visible symptom
Ringing — also called ghosting — is the surface defect that most directly betrays a printer pushed past its comfortable speed envelope. It shows up as faint ripples or echo-like waves trailing behind corners or text on the surface of a print, typically appearing after a sharp corner, edge, or sudden geometry change. The vibration causes the nozzle to oscillate in a tiny way, producing repeated outlines — echoes — of that edge or corner, which is exactly why people describe it as looking like a shadow or ghost of the original shape.
The standard remediation toolkit is well documented: tighten belts, check for loose screws on stepper motors, pulleys, and frame joints, reduce acceleration and jerk settings, and — the gold standard fix in 2026 — calibrate input shaping properly if your firmware supports it. Input shaping is genuinely effective and Bambu’s machines have it built in and reasonably well tuned out of the box, which is one of the reasons the A1 and A2L produce cleaner high-speed results than many open-source alternatives without manual tuning effort. But input shaping mitigates the problem; it does not eliminate the underlying physics. A frame with less mass to move, lower acceleration targets, and more time spent at each direction change will always ring less than the same frame pushed to its acceleration ceiling, regardless of how well the resonance compensation is calibrated.
The cooling problem: speed and layer strength are in direct tension
This is the trade-off that gets the least attention in marketing material and matters the most for anything functional. Good layer adhesion requires that the printing layer and the previous layer fully melt together, and that is harder to achieve when every layer is being actively cooled to allow the next layer to be deposited quickly on top of it. The faster a printer moves, the sooner the next layer arrives on top of the one before it — which means less time for that layer to cool naturally, which in turn pushes the slicer toward more aggressive active cooling to compensate and avoid sagging or drooping on overhangs. More aggressive cooling produces a colder bonding surface for the next layer, and a colder bonding surface produces a weaker layer-to-layer bond.
This is not a hypothetical concern — it has been measured directly. Published research on elevated printing speeds and PLA found that speeds above 300mm/s led to over-extrusion and structural defects due to thermal stress and rapid cooling, while speeds below 300mm/s caused under-extrusion and weak layer bonding from a different mechanism. There is a genuine middle band where quality is best, and pushing meaningfully outside it in either direction degrades the part — not a simple “faster is always worse” relationship, but very much not a “faster is free” one either. The same research found natural-coloured PLA reaching tensile strength up to 46.59 MPa while a darker pigment in the same base material showed measurably lower ultimate tensile strength at the same settings — which is a reminder that even pigment choice interacts with the speed and cooling equation in ways that are easy to overlook entirely.
The practical upshot for anything load-bearing: if a part’s geometry allows for reduced cooling, then turning the fan down — or off entirely where the geometry permits it — produces the best layer adhesion the material is capable of. That is directly opposed to what high-speed printing wants from the cooling system, which needs aggressive airflow to solidify each layer fast enough to support the next one without drooping. You cannot simultaneously optimise for maximum speed and maximum layer strength. One has to give, and the slicer’s default profile for a fast print has usually already decided which one it is sacrificing on your behalf without telling you explicitly.
Support instability at speed
Support structures are, by design, the least mechanically robust part of any print — thin, often single-walled, deliberately weak so they release cleanly afterward. They are also disproportionately vulnerable to the vibration and inconsistent extrusion that high speed introduces. A support tower that sways slightly under vibration during a fast print compounds layer by layer, and by the time the model geometry reaches the layer where the support actually needs to hold a critical overhang in place, a support structure that started slightly out of position has often drifted further still. The interface layer between support and model — already a deliberately weak bond by design, as covered in the prime tower and interface settings post — becomes even less predictable when the nozzle depositing it is vibrating at high acceleration rather than moving in a controlled, settled path.
This is one of the quieter reasons I tend to slow models with extensive support requirements down deliberately, beyond just the cosmetic concerns. A support failure partway through a long print is one of the more expensive failure modes in terms of wasted time and material, and the margin for that failure widens considerably at the acceleration and speed settings the marketing numbers are built around.
Inconsistent layer cooling and the parts that show it
Beyond the strength implications of reduced cooling time, there is a purely cosmetic consequence that high-speed printing makes worse: inconsistency. A part with varying geometry — thick sections next to thin ones, overhangs next to vertical walls, small isolated features next to large continuous surfaces — needs different cooling treatment at different points to look its best. At moderate speeds, the slicer and the printer’s cooling system have more time to respond to these transitions intelligently. At high speed, the nozzle moves on to the next feature before the cooling system has fully responded to the demands of the previous one, and the result is visible inconsistency across the surface — slightly different sheen, slightly different layer definition, in places where a slower print would have produced a uniform finish.
This shows up most obviously on the kind of detailed multi-part figures that make up a large proportion of what gets printed on this site — the Mario and Luigi series, the seasonal builds, the World Cup keychains. These models have exactly the geometry mix — small features next to large ones, fine detail next to flat sections — that benefits most from the cooling system having time to do its job properly rather than racing to keep pace with a toolhead at maximum speed.
Surface finish: the cumulative effect
Take the ringing, the cooling inconsistency, and the slight dimensional inaccuracy that comes from very fast movements introducing small positioning errors, and the cumulative effect on overall surface finish is the thing that actually determines whether a print looks genuinely good or merely acceptable at typical display distance. Faster speed makes the printer shake more, leading to bulging and ringing, and loose belts or weak frames make ghosting and artifacts worse — which is true even on a well-maintained machine, just to a lesser degree than on a poorly maintained one. There is no speed setting that eliminates this entirely. There is only a speed setting where the artefacts become small enough to be invisible at normal viewing distance, and that speed is reliably slower than the headline number on the spec sheet.
Where slower still wins
This is the part worth padding out properly, because “slow down for quality” is generic advice that does not tell you when it actually matters. In my own printing, here is where I deliberately choose slower settings over the speed the A1 or A2L is capable of, and why.
Fine detail and text
Anything with small text, fine facial features on a figure, or detailed surface texture needs slower outer wall and small-perimeter speeds to render cleanly. Ringing dulls corners and edges specifically, and small text is nothing but corners and edges packed into a tiny area. The recommendation across the community guidance is consistent: prioritise high-quality prints with intricate details by slowing down, particularly when small nozzles or fine layer heights are also in use. This is the single category where the speed-versus-quality trade-off is least ambiguous — fast settings on detailed text simply do not produce legible results, and no amount of post-processing recovers detail that was never resolved by the nozzle in the first place.
Anything load-bearing or functional
Given the direct relationship between cooling and layer adhesion covered above, anything that needs to survive mechanical stress — brackets, clips, parts that will be handled or carry load — benefits from slower print speeds and reduced cooling wherever the geometry allows it. This connects directly to the strength advice covered in the 5-axis printing post, where the strength gains from non-planar printing come specifically from controlling layer orientation relative to stress — the same underlying principle of prioritising bond quality over deposition speed, just achieved through geometry rather than through slowing the standard process down.
Transparent and glass-like prints
The settings covered in the transparent printing guide are essentially the inverse of everything high-speed printing optimises for: slow speed, minimal or zero cooling, maximum dwell time per layer to allow complete fusion. This is the most extreme example on this site of a print type where speed and quality are directly opposed, with quality winning comprehensively. There is no fast transparent print. The physics of achieving clarity require exactly the conditions that high-speed printing eliminates.
First layers, regardless of the rest of the print
Even on a print where the bulk of the job runs at speed, the first layer remains an exception worth protecting. A first layer printed too fast is more prone to inconsistent adhesion, and a failure at the first layer ends the print entirely rather than producing a merely cosmetic defect. This is one habit that has not changed even after two years of trusting the A1’s reliability, as covered in the long-term ownership post — the first layer is the one place in the whole job where I have never stopped paying attention, and slower first-layer speeds remain the sensible default regardless of how fast the rest of a profile is set.
Multi-part assemblies where surfaces must match
The case made in the multi-part printing post for cleaner colour separation depends on each individual part having a consistent, predictable surface finish so the joins look intentional rather than mismatched. Printing different parts of the same assembly at different speeds — or at a speed inconsistent enough to vary surface quality across the build — undermines exactly the visual cohesion that makes a well-assembled multi-part figure look like a single object rather than a collection of mismatched pieces. Consistency, which usually means moderate and repeatable speed rather than maximum speed, matters more here than raw throughput.
Anything going straight onto a shelf
This is the broadest and most honest category, and it covers most of what actually gets printed in this hobby. A display piece, a gift, a seasonal build, a figure for a godson’s shelf — none of these have a deadline that genuinely benefits from shaving forty minutes off a six-hour print. The cost of that speed, paid in ringing, inconsistent surface finish, and reduced layer strength, is a cost incurred for a benefit that does not actually apply to how the finished object will be used or judged. The print sits and is looked at. It is not shipped to a customer on a turnaround clock.
Where speed genuinely does matter
Fairness requires acknowledging the other side properly. Speed is not a meaningless marketing number invented to sell printers — it has real value in specific contexts, and dismissing it entirely would be as lopsided as the marketing that oversells it. Calibration prints, test geometry, anything where you are validating a setting change rather than producing a finished object, benefit from fast iteration — print fast, check the result, adjust, print again. Rough drafts and fit-check prototypes where dimensional accuracy at a coarse level matters more than surface finish are another legitimate speed use case. And for anyone genuinely running production volume — small business owners fulfilling multiple orders, print farm operators, anyone whose time is the actual constraint on output — the speed-versus-quality calculus is different from mine, because the value of finishing more units per day can genuinely outweigh a modest quality reduction on each individual unit, provided that reduction stays within the bounds the customer or use case will tolerate.
The Snapmaker U1 and InfiMech MX Pro comparisons covered in the tool changer economics post make a related point from a different angle: a piece of equipment’s theoretical capability and the setting at which you should actually operate it are two different things, and the gap between them is where the real decision-making happens. Speed is the same. The A1 and A2L are both capable of meaningfully faster printing than I typically run them at. That capability is there when I need it — calibration work, draft iterations, the occasional genuinely time-pressured job like the World Cup sweepstake keychains, where dozens of fast, simple prints needed to be turned around before a deadline. It is simply not where I default to for the majority of what actually gets printed.
The honest conclusion
The marketing arms race over speed numbers is not dishonest exactly — the printers genuinely can move that fast, and the benchmark times are genuinely achievable under controlled conditions on the right geometry. What the marketing leaves out is the trade-off curve that every one of those speed numbers sits on, and the fact that the curve bends sharply against quality well before the headline figure is reached on anything resembling a real, detailed model. Ringing, reduced layer cooling time and the strength loss that comes with it, support instability, and inconsistent surface finish are not edge cases or signs of a badly tuned machine. They are the predictable, physically inevitable cost of pushing acceleration and speed toward the numbers that look good on a box.
For a hobbyist printing things that are going to be looked at, handled, given as gifts, or assembled into something that needs to hold together — which describes the overwhelming majority of what gets made in this hobby outside of a genuine production environment — quality wins that trade-off more often than not. The fastest setting a printer is capable of is rarely the setting that produces the best version of what you are actually trying to make. Knowing where on that curve a specific print genuinely benefits from speed, and where it definitely does not, is a more useful skill than chasing the lowest possible time on the slicer’s estimate.