The prime tower is one of those features that most multi-colour FDM users accept without much scrutiny. It is there by default, it grows alongside your model, and when the print finishes you peel it off and put it in the bin. What most people do not examine is a specific question: why does the prime tower need to be the same height as the model? The answer is that it does not — and the setting that fixes this is called No Sparse Layers. It is tucked away in OrcaSlicer and PrusaSlicer, currently absent from Bambu Studio as a native feature, and it is one of the most effective prime tower waste reduction tools available. This post explains what it does, why it works, where to find it, and what to watch out for when using it.
The prime tower problem: why it grows to full height
The prime tower exists to re-establish consistent extrusion pressure after a colour change. When the AMS switches filament, the nozzle travels to the tower, deposits the initial unpredictable flow of the incoming colour, and returns to the model with the extrusion now stable and clean. The tower provides a controlled surface to absorb the inconsistent extrusion that the colour change produces before the nozzle touches the actual print.
The reason the tower grows to the full height of the model is structural stability. A prime tower must be tall enough to reach the current layer height when the nozzle arrives to purge. If the tower stopped growing at the last colour change layer and the nozzle arrived at a layer well above that, it would have no surface to deposit onto. The conventional solution is to keep building the tower on every layer, whether a colour change happens on that layer or not, so it is always at the correct height when needed.
On layers where no colour change occurs, the tower prints with the currently active filament — adding material for no functional reason beyond maintaining the tower’s height. This is the waste that No Sparse Layers addresses. The tower is only high enough to support purging and wiping. That seemingly saves a significant amount of filament.
What No Sparse Layers actually does
No Sparse Layers changes the prime tower’s construction logic. Instead of printing the tower on every single layer of the model, the slicer skips the tower on layers where no colour change is scheduled. Only layers that actually involve a colour change receive a tower contribution. The tower still exists — but it is now a sparse, discontinuous structure that only grows when it has a functional reason to.
The physical result is a prime tower that looks very different from the conventional version. Rather than a solid column growing layer by layer to match the model’s full height, No Sparse Layers produces a structure that jumps height in steps — printing a section at the layer where a colour change occurs, then nothing until the next colour change, then another section, and so on. Between the colour change layers, the tower does not exist at that height. The nozzle does not visit it. No material is deposited there.
The savings from this are directly proportional to how spread out the colour changes are across the model’s height. A model where colour changes happen on every third layer will show modest savings — the tower still needs to print frequently. A model where colour changes are concentrated in the lower half and the upper half is single-colour will show dramatic savings — the tower stops growing at the height of the last colour change and the upper portion of the print produces no tower material at all.
This also has a beneficial interaction with print time. Every layer the prime tower prints adds travel time — the nozzle must move to the tower, deposit material, and return to the model. On layers with no colour change, this travel is entirely eliminated when No Sparse Layers is active. For prints with many colour-change-free layers, the accumulated time saving across those omitted tower visits adds up meaningfully.
Where to find it: OrcaSlicer
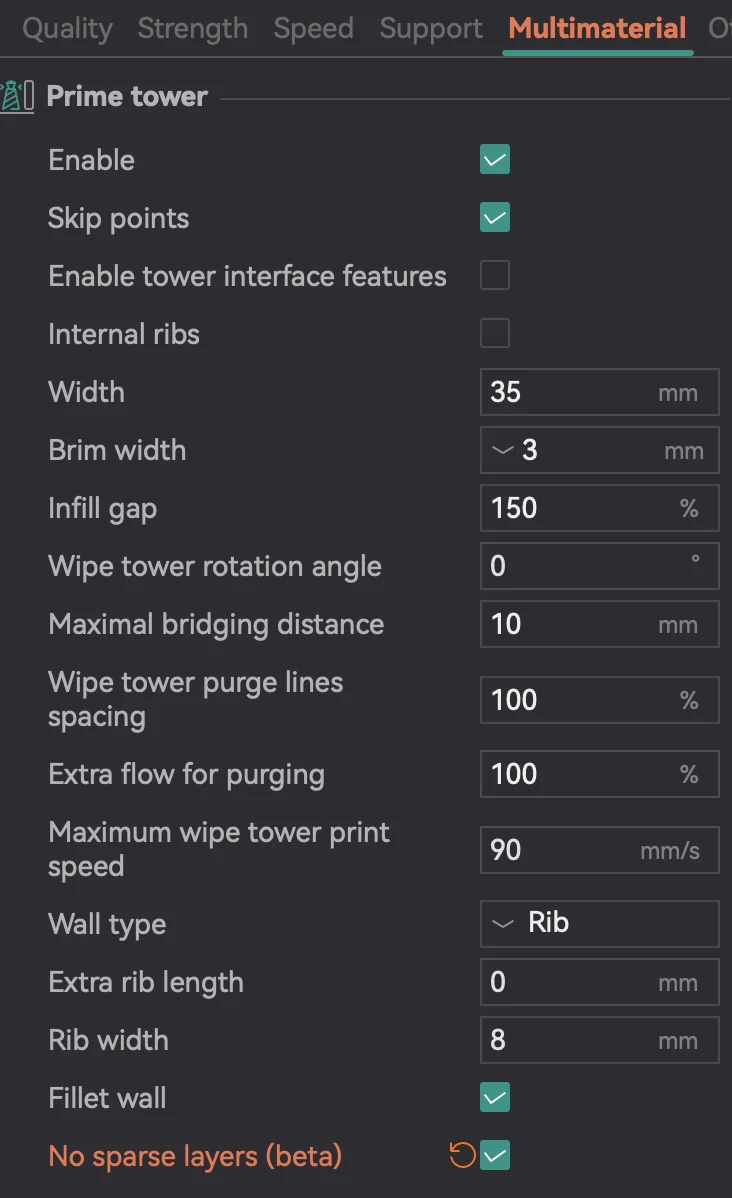
In OrcaSlicer, No Sparse Layers is found in Process → Multi Material → Prime Tower. You must first enable the Prime Tower checkbox to see the No Sparse Layers option below it. The setting is labelled as beta in some OrcaSlicer versions — this reflects the fact that the feature has some edge case behaviours that are still being refined, which we will cover in the caveats section.
The exact path in current OrcaSlicer versions:
- Open Process settings
- Navigate to the Multi Material tab
- Ensure Enable Prime Tower is checked
- Below it, check No Sparse Layers
- Slice and check the preview — the tower should be visible only at layers where colour changes occur
Where to find it: PrusaSlicer
In PrusaSlicer, No Sparse Layers is an experimental setting found in Print Settings → Multiple Extruders → Wipe tower. The wipe tower must be enabled first. No Sparse Layers then appears as an option within the wipe tower settings. In PrusaSlicer it has been available for longer and is more mature than in OrcaSlicer — the Prusa community has more reported experience with it across a wider range of models and material combinations.
Bambu Studio: the notable absence
Bambu Studio does not have No Sparse Layers as a native option at the time of writing. This has been requested on the Bambu Lab community forum multiple times. Why not give the user the choice and add an option like Prusa does in their slicer where you set your prime tower with No Sparse Layers? The tower is only high enough to support purging and wiping, which saves a significant amount of filament. The feature request exists in the Bambu GitHub issue tracker. It has not yet been implemented.
Since OrcaSlicer supports Bambu machines directly — and OrcaSlicer 2.4.0 Alpha now supports the Kobra X as well as Bambu hardware — this is one of the legitimate workflow advantages of using OrcaSlicer over Bambu Studio for multi-colour work. If reducing prime tower waste is a priority and you are on a Bambu machine, switching your multi-colour slicing to OrcaSlicer gives you access to No Sparse Layers that Bambu Studio does not currently offer.
The feature has been requested from Bambu Studio’s team but has not yet been implemented. A forum thread as early as 2022 requested it, with the observation that it does save on filament. The timeline for implementation in Bambu Studio is unknown — the feature sits in the request backlog alongside many other PrusaSlicer-derived features that have not made it into Studio’s more curated interface.
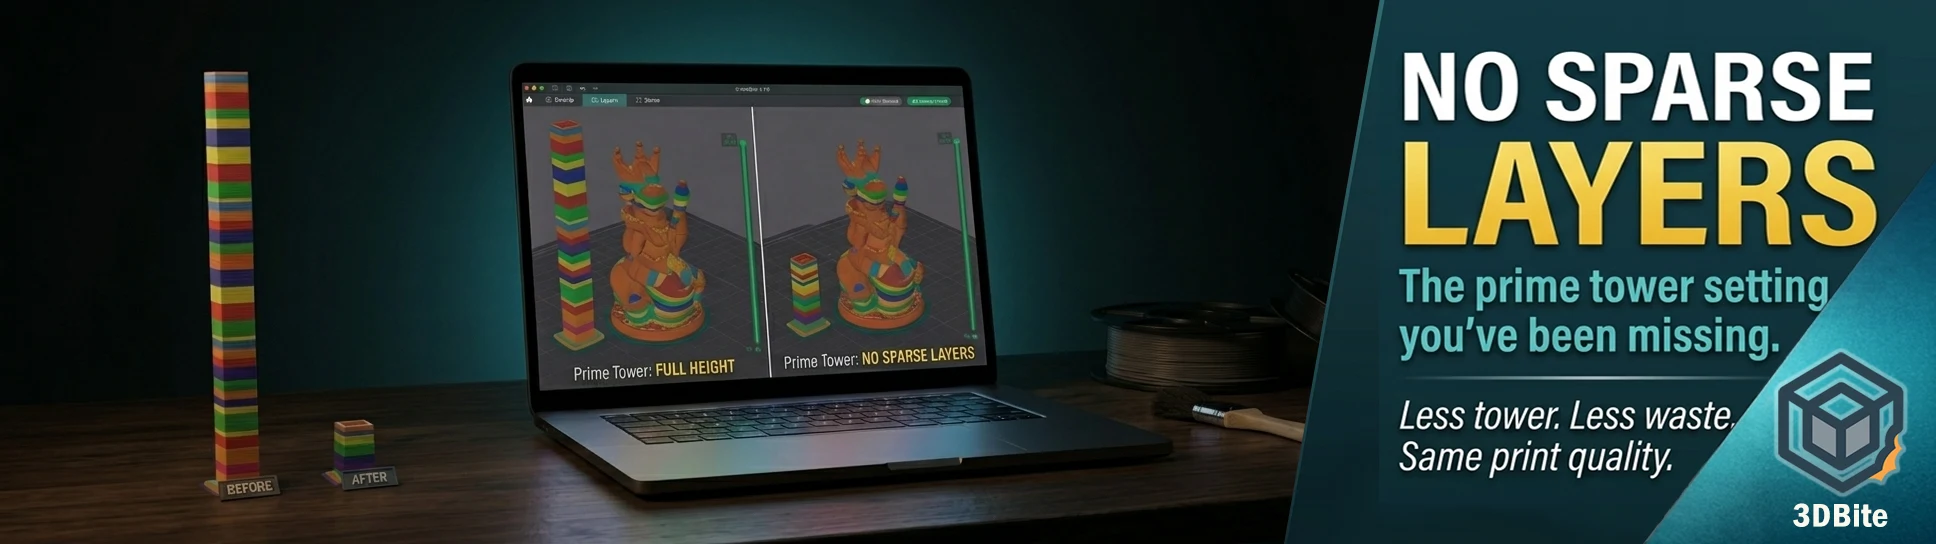
A visual comparison: what it looks like in the layer preview
The clearest way to understand the effect is to compare the layer preview of the same model with and without No Sparse Layers enabled.
With No Sparse Layers disabled (standard behaviour): scroll through the layer preview from bottom to top and the prime tower appears on every single layer, maintaining constant height alongside the model. On layers with no colour change, a solid contribution from the current filament is visible on the tower. The tower’s total volume is proportional to the model’s full height.
With No Sparse Layers enabled: scroll through the same layer preview and the prime tower disappears on layers where no colour change occurs. It reappears at the layers where a swap is scheduled, deposits the purge material, and then disappears again until the next swap. The final layer of the prime tower is the final layer on which a colour change occurs — which may be well below the model’s full height.
Where it saves the most: specific use cases
Models with colour changes concentrated in lower layers
This is the prime use case. A figurine where the colour transitions are in the body, face, and clothing but the top half is a single dominant colour — the hat, hair, or background — has most of its colour changes below the midpoint. Standard prime tower: grows to full height. No Sparse Layers: stops at the height of the last colour change, which might be 60% of the total model height. The saving is directly the volume of tower that would have been printed above that point — potentially a third or more of the total tower material on the right model.
Support interface material prints
Using a different material in a dedicated AMS slot for support interfaces — PETG supports under a PLA model, PVA for complex geometries — involves colour changes throughout the model wherever supports contact the surface. Depending on model geometry, these interfaces may be concentrated in specific height ranges rather than distributed evenly across the full height. No Sparse Layers reduces the prime tower to only the layers where these interface swaps occur. For support interface prints, Prusa manages to get very good results with a prime tower in most cases at least two thirds smaller using no sparse layers.
Simple two-colour prints with text or logo accents
A model printed primarily in one colour with a logo, name, or text embossed on the surface in a contrasting colour typically has all the colour change activity confined to the height range of the text or embossed element. If the text is on the lower third of the model, the prime tower with No Sparse Layers stops growing at the top of the text zone. The remaining two thirds of the model’s height require no tower at all.
The caveats: what to watch for
No Sparse Layers is marked as beta in OrcaSlicer for a reason. Several real-world edge case problems have been documented in the OrcaSlicer GitHub issue tracker and are worth understanding before applying the setting to every multi-colour job.
The nozzle height collision risk
The fundamental risk of No Sparse Layers is this: when the nozzle travels to the prime tower at a colour change layer, the tower is shorter than the model at that point. The nozzle must descend from its current print height down to the tower’s current height, make the purge deposit, and then return to the model’s current height. The issues with it for the X1 and P1 are that you need plenty of space around the prime tower to allow room for the print head to go up and down. You also need room to ensure that the X and Y rails do not hit the model when the Z axis moves down.
On models with wide bases that have protrusions — a figure with a broad base and a staff or antenna, for example — the nozzle descending to the prime tower height and then sweeping back to the model may physically collide with that protrusion. The OrcaSlicer issue tracker documents this: when printing certain models in multicolour, it is impossible to utilise sparse layers to minimise purge waste due to the constraints of the model being printed. The model will always be contacted by the sloping motion of the head as it proceeds to the prime tower, resulting in pieces being dislodged. Always check the layer preview on your specific model before committing to a long print with No Sparse Layers active.
Z-offset interaction
An OrcaSlicer bug documented in version 2.3.1 shows that No Sparse Layers does not always correctly account for the printer’s Z-offset setting, potentially causing the nozzle to descend below the correct height on the first prime tower layer. This resulted in nozzle clogging as it collides with the bed and filament cannot go freely, also slightly damaging the bed. Verify your Z-offset is correctly applied when using No Sparse Layers, particularly on first use with a new printer configuration. The issue is logged and will be addressed in a future release.
Tool changer specific: Z height after park
For tool changer machines specifically (Snapmaker U1 and similar), a documented bug in OrcaSlicer 2.3.x causes the toolhead to not return to the correct Z height after a prime tower purge, risking a collision with taller parts of the model on the subsequent move. When a tool change is happening, the tool will move over the prime tower position, lower Z to the tower height, prime, and then park the tool head without going back to the original Z value. Because of that the tool head will bump into printed parts. For tool changer users, monitor the OrcaSlicer release notes for the fix before relying on No Sparse Layers in production.
Floating layer artifacts
Some users have reported a floating layer appearing at the very end of the prime tower — a final sparse layer printed at the model’s full height above the last actual tower section, leaving a mid-air artifact. This is a slicer logic issue in specific configurations. No Sparse Layers on the purge block creates a single mid-air purge layer above the block at approximately the normal height of the block. Check the layer preview before printing — a floating layer at the top of the tower range in the preview is the warning sign. If present, the affected layer can sometimes be removed by adjusting the colour change zone or the tower width slightly.
How to use it safely: a practical checklist
- Enable No Sparse Layers in OrcaSlicer — Process → Multi Material → Enable Prime Tower → No Sparse Layers
- Check the layer preview thoroughly — scroll through every layer and verify the prime tower appears only at colour change layers and that no floating layers exist at the top of the tower
- Verify model geometry around the tower — ensure there are no wide overhangs or protrusions that the nozzle would pass through on its descending travel to the tower. The tower’s position on the plate should be in open space relative to the model
- Check for the floating layer artifact — if a final mid-air layer appears in the preview at the very top of the tower range, adjust tower width or colour zone boundaries and re-slice
- Test on a shorter print first — before running No Sparse Layers on a six-hour multi-colour job, test it on a faster print of the same model at reduced scale or a similar model type. Confirm the nozzle movement to the tower is clean and collision-free
- Check estimated filament usage — OrcaSlicer’s filament estimate shows per-filament usage including purge. Compare the total prime tower material with and without No Sparse Layers for your specific model to quantify the saving before printing
How it fits with the other waste reduction methods
No Sparse Layers is most effective when combined with the other prime tower waste reduction techniques covered in the prime tower waste guide. The methods stack:
- Reduce the prime tower to No Sparse Layers height — eliminates tower material on non-colour-change layers entirely
- Flush into infill — redirects a proportion of the purge volume into the model’s infill rather than the tower
- Sparse infill in the prime tower — reduces the density of material within the tower sections that do exist
- Reduced flushing multiplier — reduces the purge volume per colour change pair
- Model orientation — concentrating colour changes in lower layers maximises the height reduction from No Sparse Layers
Used together, this stack of techniques can reduce prime tower waste from a significant proportion of total filament used to a fraction of that. No Sparse Layers addresses the vertical height component of waste. The other techniques address the per-change volume component. Neither alone produces the minimum achievable waste. Both together do.
Summary
No Sparse Layers tells the slicer to build the prime tower only on the layers where it is actually needed — the layers with a colour change — and skip it everywhere else. The saving is proportional to the gap between the model’s full height and the height of its last colour change: models with all colour changes in the lower portion benefit most, models with colour changes distributed evenly across the full height benefit least. The feature is available in OrcaSlicer (Process → Multi Material → Prime Tower → No Sparse Layers) and PrusaSlicer, but not yet in Bambu Studio natively — which is a legitimate reason to use OrcaSlicer for multi-colour work if you are on Bambu hardware.
The beta label in OrcaSlicer reflects real edge case issues — nozzle collision risk on complex geometry, Z-offset interaction bugs, floating layer artifacts — that require you to check the layer preview carefully before committing to long prints. Used with appropriate verification, it is one of the most effective single-setting changes available for reducing multi-colour printing waste, and it is one that costs nothing except the time to enable it and check the result.