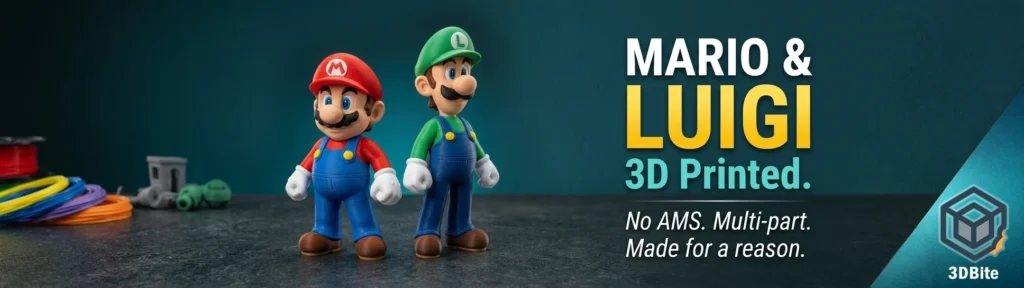
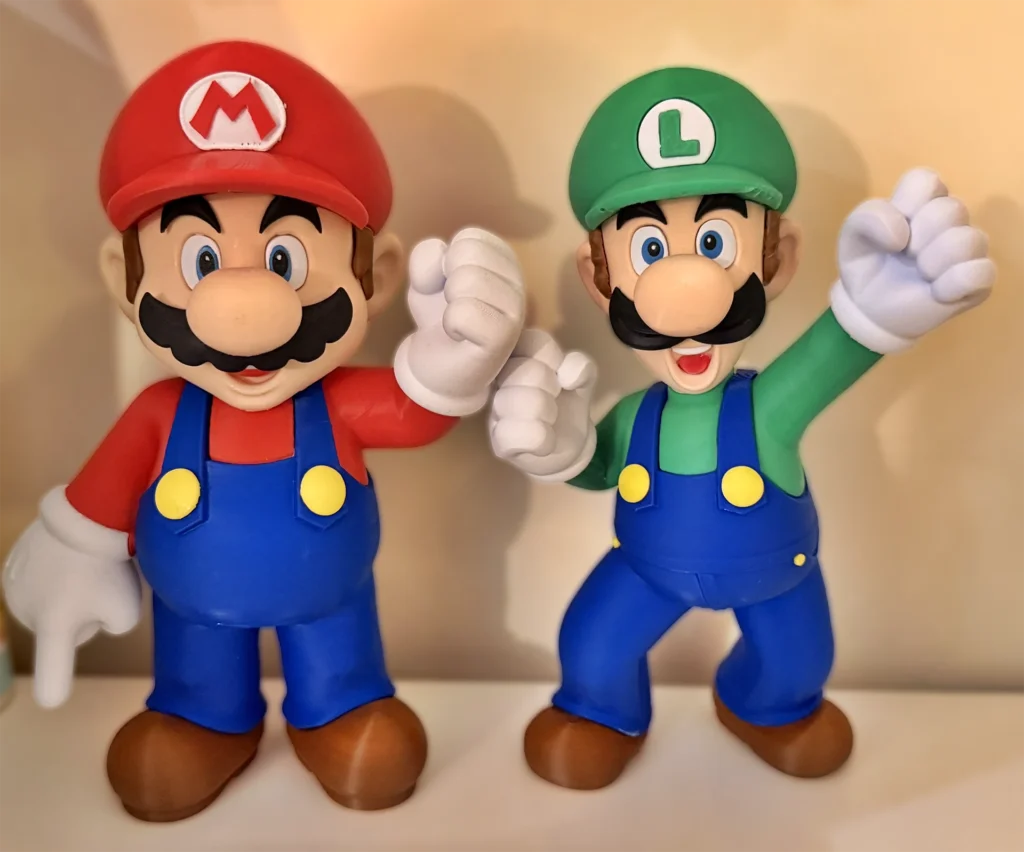
My godson is deep in his Super Mario phase. We are talking full commitment — the games, the film, the merchandise, the lot. So when I was thinking about what to print him this month, there was really only one answer. Mario and Luigi, side by side, from a designer on MakerWorld who has clearly put serious work into making these accessible without an AMS. Two figures, multiple colours, no multi-material system required. Just patience, a bit of planning, and some superglue.
Both models are by ModelLover on MakerWorld — a designer who has built out a solid series of Nintendo characters in this style. The approach is the same for both: each colour is printed as a separate job, the parts slot and glue together, and the result is a fully coloured figure without touching an AMS. It is more work than loading four spools and hitting print, but it is completely accessible on any single-nozzle machine and the results speak for themselves.
This post covers how I approached both prints, the one support tweak I had to make on both figures, why I used Variable Layer Height on every colour part, and what the assembly process actually involves.
The models
Both figures are designed at approximately 23 cm tall at the default scale, which gives you a substantial display piece rather than a desk trinket. The geometry is faithful to the game character proportions — round heads, chunky overalls, the characteristic hats — which means there is a lot of curved and domed surface area. That matters for how you slice them, which I will come to.
Each figure is split into individual parts per colour. For Mario that means red for the hat and overalls, blue for the shirt, skin tone for the face and hands, white for the eyes and gloves, and brown for the shoes — each printed as its own separate job. Luigi follows the same logic with the colour set shifted: green hat and overalls, blue shirt, the same skin and white, black for his shoes and moustache details. The downloaded files from MakerWorld come with Bambu Studio print profiles already set up, so layer height, supports, and material settings are pre-configured. You are not starting from scratch on each colour.
The eyes on both figures use a small spike alignment feature built into the model — you find the correct position with it in place, note it, then remove the spike and glue the remaining eye parts. It is a neat solution to what would otherwise be a fiddly free-form alignment problem.
Download links: Super Mario — MakerWorld | Luigi — MakerWorld
The one thing I changed: trouser supports
The default profiles work well across most of the parts. The hat, head, body, and shoes all came out cleanly on the first attempt. The area that needed attention on both figures was the overalls — specifically the trouser sections, which have steep overhangs where the legs meet the body geometry.
On my first runs, those overhangs sagged. The default support configuration in the profile was not providing enough coverage for the specific geometry on the Bambu A1, and the result was rough underside surfaces on the trouser parts that would have been visible on the assembled figure. Not a print failure — just not good enough for a gift.
The fix was straightforward. I went into the support settings in Bambu Studio and switched from the default tree supports to normal supports for the trouser parts, with the support interface layer enabled. Normal supports give more predictable coverage on this kind of geometry — tree supports are excellent for organic shapes where you need to minimise contact points, but for the defined angular overhangs on the trouser sections they were leaving gaps. The interface layer ensures the support surface that contacts the part is smooth and releases cleanly, which matters here because the underside of the overalls is a visible surface after assembly.
After the tweak, both Mario’s and Luigi’s trouser parts came out with clean undersides. If you are printing these and hitting the same issue, change the support type on those specific parts. Everything else in the default profile can stay as-is.
Variable Layer Height: why it matters
I used Variable Layer Height on every colour part of both figures, and it made a noticeable difference to the quality of the finished prints. This is the kind of technique that looks like a minor slicer setting but actually addresses a fundamental problem with how FDM printers handle curved geometry.
The issue is the staircase effect. When you print at a fixed layer height — say 0.2 mm throughout — every horizontal surface and gentle curve gets printed in discrete steps. On a vertical wall this is nearly invisible because the steps are edge-on. On a dome, a rounded hat, or a curved cheek, those steps are face-on and they read as a visible texture. The rounder the surface, the worse it looks at a given layer height, because you are essentially approximating a continuous curve with a series of flat steps.
Variable Layer Height solves this by automatically reducing the layer height in sections of the model where the geometry is curved or sloped, and allowing thicker layers where the geometry is vertical and the staircase effect is not an issue. Bambu Studio’s implementation does this with a colour-coded slider alongside the model: green indicates thinner layers being applied, yellow is mid-range, and red is thicker. You can use the Adaptive button to let the slicer calculate the distribution automatically based on the model geometry, or manually adjust specific height ranges.
For the Mario and Luigi figures specifically, the areas that benefit most are the hat tops, the head, and the rounded parts of the body. These are the areas where a fixed 0.2 mm layer height leaves the most obvious stepping. With Variable Layer Height applied, those sections drop to 0.08–0.12 mm automatically, while the straighter sections of the legs, arms, and flat surfaces stay at 0.2 mm or close to it. The practical result is smoother domes and cleaner facial geometry, without the print time penalty of slicing the entire figure at 0.08 mm.
The one thing to do after running the Adaptive calculation is click Smooth a couple of times. Abrupt transitions between layer height zones can cause the printer to change speed and extrusion rate suddenly, which introduces its own artefacts at the transition point. Smoothing the curve in the layer height graph creates gradual transitions rather than sharp steps, and the result on the printed surface is seamless. Apply Smooth two or three times, check that the minimum height zones are still sitting on the curved areas you care about, then slice.
For a 0.4 mm nozzle on the A1, Bambu’s tested range for Variable Layer Height is 0.08–0.28 mm. Do not push the minimum below 0.08 mm — you will be outside the calibrated range and print reliability suffers.
Print settings
| Setting | Value used | Notes |
|---|---|---|
| Filament | eSun PLA+ | Used across all colour parts. Consistent across jobs |
| Base layer height | 0.2 mm | Starting point before Variable Layer Height applied |
| Variable Layer Height | 0.08–0.2 mm adaptive | Applied to all parts. Smooth run 2–3 times after Adaptive |
| Infill | 15% | Display piece — structural strength not a priority |
| Infill pattern | Grid | Default from profile, left as-is |
| Supports | Normal (modified from tree on trouser parts) | Support interface layer enabled |
| Support interface | Enabled | Cleaner contact surface on visible undersides |
| Cooling | Standard PLA profile | No changes needed |
| Nozzle temp | 220°C | Standard eSun PLA+ on A1 |
| Bed temp | 55°C | Textured PEI plate |
Filament colours used
Mario
Red (hat and arms) Bambu Lab Basic Red PLA, blue (overalls/trousers) eSun blue , skin tone (face/head) eSun, white (eyes, gloves, buttons), brown (shoes). Standard eSun PLA+ throughout. The skin tone was the one colour I had to source specifically — it is not a colour sitting on the shelf for most people. eSun do a flesh/skin colour in their PLA+ range that works well here.
Luigi
Green (hat and arms), blue (overalls/trousers), same skin tone as Mario (face/head) eSun ‘beige’, white (eyes, gloves, buttons), black (moustache/hair). Using the same blue and skin tone across both figures meant I could run those jobs back to back without swapping spools, which saved time across what is already a multi-session print project.
Assembly
Both figures use a combination of press-fit connections and superglue. Most of the larger parts — body sections, head, hat — have alignment pegs and sockets that locate correctly before glue. The smaller detail parts, particularly the buttons, eyes, and facial features, require more care.
The eye alignment system that ModelLover uses is worth following precisely. The spike locator lets you find the correct position on the curved face surface before you commit to gluing. Take your time with it, get both eyes positioned symmetrically, then remove the spike and glue in stages. Rushing the eyes is the one place where the whole figure’s character can go wrong — if they are slightly off-axis the expression reads differently.
On Mario, the assembly went smoothly. Parts fitted well and the alignment pegs did their job. On Luigi, a few parts needed slightly more coaxing — the community notes on MakerWorld flag this as a known experience with this figure, likely due to minor dimensional differences in the split geometry. Nothing a bit of firm pressure and patience did not solve, but worth knowing before you start. Have a small flat file or sandpaper to hand for any parts that are just slightly tight.
For the glue, I used standard cyanoacrylate (superglue) applied sparingly with a cocktail stick for the smaller parts. For the larger body joins, a slightly thicker CA gel gives you a few seconds more working time before it sets, which is useful when you are aligning a large curved surface. Do not rush the cure — let each join set fully before handling the subassembly, particularly before adding parts that put stress on the previous join.
Result
Both figures came out well. At 23 cm tall they are a proper display size — substantial enough to sit on a shelf and read clearly from across a room. The Variable Layer Height made a visible difference to the hat and head sections in particular. Compared to my first test parts printed at flat 0.2 mm, the adaptive version has noticeably smoother domes. Under close inspection you can still see layer lines, but at normal viewing distance the rounded surfaces look clean.
The colour separation on the assembled figures is sharp. This is the advantage of printing each colour independently rather than relying on AMS colour changes, which always involve some degree of bleed at transition layers. When every part is a single colour printed clean, the joins between assembled parts are crisp and the overall figure reads clearly.
My godson’s reaction was everything you want from a print like this. The figures went straight onto his shelf, Mario and Luigi side by side, which is exactly where they should be.
Is this print worth the effort?
Yes, with the right expectations. This is not a single-session print. Between the multiple colour jobs across two figures, plus assembly time, you are looking at a multi-day project. If you are printing at 100% scale, each figure involves five or six separate print jobs depending on how you batch the smaller parts. Plan your filament colours in advance, batch the shared colours across both figures to save spool-swapping, and do not try to rush the assembly.
The payoff is a pair of figures that look genuinely good and are completely free to download. ModelLover’s design is well thought out — the part splits are sensible, the alignment features work, and the Bambu Studio profiles take most of the settings decisions away from you before you even start. The trouser support tweak aside, I did not need to significantly deviate from the provided profiles.
If you have someone in your life who is into Super Mario, this is a strong project. The models are free, the filament cost across both figures is minimal, and the result is something you genuinely cannot buy off a shelf in quite the same way.
Both models are free. The filament cost across two figures is a few pounds. The reaction from a six-year-old Super Mario fan: priceless.
Model files
Both models are free to download from MakerWorld:
If you print these, give the designer a boost on MakerWorld. The series is well executed and free — supporting good designers keeps more models like this coming.
Important note: These are copyrighted Nintendo characters. As a project/personal-use I am documenting my own prints rather than commercial promotion, this is standard practice across the 3D printing community — but the models themselves are fan-made and Bambu/MakerWorld hosts them under their own terms. This post is written in that spirit — documenting the print experience, not selling or distributing the files.