Pull a print off the plate and the base flares outward slightly wider than the rest of the model — a visible bulge right at the bottom, like the part is standing on a small flared foot rather than a clean vertical wall. That is elephant’s foot, and it is one of the more common first-layer defects in FDM printing, closely related to the diagnostic work covered in the first layer troubleshooting post but distinct enough to deserve its own proper explanation. The mechanism is genuinely simple once it is explained properly, and the fix is one of the more reliably solvable problems in this whole hobby once you understand what is actually happening physically rather than guessing at settings.
What is actually happening
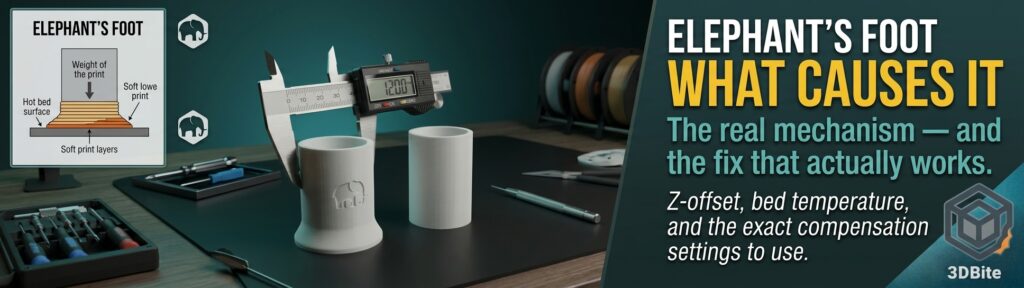
Elephant’s foot is the outward bulge on the first few layers of a print, caused by the nozzle squashing the base against a hot bed while the weight of everything printed above continues to spread it further. The mechanism has two genuinely distinct contributing causes that usually act together rather than separately, and understanding both is what lets you fix it properly rather than guessing.
The first is mechanical: if the nozzle is too close to the bed — an incorrect Z-offset, or a bed that is not level at the specific point the print starts — the first layer gets physically squashed flatter and wider than the slicer intended. Once that compressed plastic cools, the outward spread becomes permanent, exactly the same squish-related mechanism covered in the “first layer squished or uneven” section of the first layer troubleshooting post, just specifically affecting the base’s width rather than the whole layer’s general appearance.
The second is thermal, and it is the cause most people underestimate. Thermoplastics do not have a sharp melting point — they soften gradually above their glass transition temperature rather than switching cleanly between solid and liquid. A hot bed, sitting at 60-100°C depending on material throughout the entire print, keeps the first several layers genuinely soft for considerably longer than just the moment they are deposited. While those lower layers remain soft, the weight of everything printed above continues to press down and spread them outward, slowly, over the course of the whole print — which is exactly why elephant’s foot sometimes affects several layers rather than just the very first one, and why a part can look fine immediately after printing and only show the bulge clearly once fully cooled and removed.
Telling it apart from other first-layer defects
This is worth doing properly before reaching for a fix, because elephant’s foot is genuinely easy to confuse with the squish and gap defects already covered in the first layer troubleshooting post, and the correct fix differs depending on which one you actually have. Elephant’s foot specifically produces a bulging, flared base that is measurably wider than the rest of the print — check with digital calipers at the very bottom versus a few millimetres up the wall, and a genuine elephant’s foot shows a clear width difference at that specific transition point, not a general unevenness across the whole first layer. If the entire first layer looks uniformly over-squished rather than specifically flared at the base-to-wall transition, that is the general over-squish problem covered in the first layer troubleshooting post rather than elephant’s foot specifically, and the two problems respond to overlapping but not identical fixes.
The fix, in the correct order
Step 1: Confirm Z-offset and bed levelling first. This is the most common root cause and the cheapest to rule out. Rerun the automatic bed levelling and first-layer calibration the A1 and A2L both perform, and confirm Z-offset is not set too low — a nozzle sitting too close to the bed is squashing the first layer mechanically before any of the thermal mechanism even comes into play.
Step 2: Step the bed temperature down after the first few layers. This is described consistently across every source researched for this post as the single most under-used fix, and it directly targets the thermal mechanism rather than the mechanical one. Use the normal, full bed temperature for the first 2-5 layers specifically to lock in good adhesion, then step the temperature down for the remainder of the print — this allows the base to solidify sooner while the adhesion-critical early layers still got the heat they needed. Both Bambu Studio and OrcaSlicer support a temperature change at a specific layer height through the custom G-code or per-layer temperature controls, and this is worth setting up deliberately for any print where elephant’s foot has already been a problem on a specific material and plate combination.
Step 3: Enable Elephant Foot Compensation in the slicer. This is the most direct, purpose-built fix available, and it works by deliberately scaling the first layer narrower to compensate for the spreading that is about to happen — using the squish itself to cancel out the squish, essentially. In Bambu Studio: Process → Quality → Elephant Foot Compensation. In OrcaSlicer: the identical setting and location, since both slicers share the underlying engine. Start at 0.1mm and increase to 0.2mm if the bulge persists; going meaningfully beyond 0.2mm on a standard 0.4mm nozzle risks narrowing the base enough to create its own problems with adhesion or fine detail at the very bottom of a model.
Step 4: Improve first-layer cooling. Ensure the part cooling fan engages properly from layer two onward — if it is disabled or set too low specifically for the first few layers, those layers stay soft for longer than necessary, compounding the thermal spreading mechanism. For prints with a genuinely small first-layer footprint, where each individual layer finishes printing quickly and has little time to cool before the next one lands on top, ramping cooling more aggressively from layer one, or using a minimum layer time setting to force a brief pause if a layer would otherwise print too fast to cool properly, both help specifically with this small-footprint case.
Elephant foot compensation and bed temperature by material
| Material | Standard bed temp | Step-down temp (after layer 2-5) | Compensation starting point | Notes |
|---|---|---|---|---|
| PLA | 55-60°C | 50-55°C | 0.1mm | Generally the least prone to this defect given PLA’s comparatively low bed temperature overall |
| PETG | 70-85°C | 65-70°C | 0.15mm | Higher bed temperature range makes PETG more prone to this than PLA — see the PETG materials post |
| ABS / ASA | 95-110°C | Keep within 5-10°C of standard — these materials need the sustained heat to avoid warping | 0.15-0.2mm | The highest bed temperatures of common materials make elephant’s foot genuinely more likely here, but the warping risk covered in the A1 enclosure post means the step-down needs to be more conservative than for PLA or PETG |
| TPU | 40-50°C | Not typically needed — lower bed temperature range makes this less of an issue | 0.1mm if it appears at all | Soft material behaviour generally shows up as other defects before elephant’s foot becomes the dominant problem |
The design-stage fix worth knowing about
This is worth a brief mention for anyone designing their own models rather than printing someone else’s. A small chamfer added to the very bottom edge of a model in CAD — a 45-degree bevel running up just the first millimetre or two — gives the compressed, spreading base somewhere to go that does not read as a visible defect, since a chamfer is expected to look angled rather than perfectly vertical. This does not fix the underlying thermal and mechanical mechanism at all, but it is a genuinely useful trick for a model where the bottom edge is visible and a small cosmetic allowance is acceptable.
The combined fix that resolves most cases
Rather than working through every step above in sequence every single time, the combination that one source describes as resolving the large majority of cases on its own is worth trying first: set Elephant Foot Compensation to 0.15mm, lower bed temperature by 5°C from the material’s default, and confirm the cooling fan is genuinely engaging from layer two. That three-setting combination addresses the mechanical, thermal, and cooling mechanisms simultaneously with a single round of changes, rather than isolating and testing each variable individually — a sensible starting point before falling back to the more methodical, one-variable-at-a-time diagnostic order above if the problem persists.
The summary
Elephant’s foot is a genuinely well-understood, reliably solvable defect once the two contributing mechanisms — mechanical squish from an incorrect Z-offset, and thermal spreading from a bed that stays hot long after the first layer has been deposited — are properly separated from each other. Confirm Z-offset and levelling first, since that rules out the cheapest and most common cause. Step the bed temperature down after the first few layers to address the thermal mechanism directly. Add Elephant Foot Compensation as the purpose-built slicer fix. And confirm cooling is genuinely active from layer two. Done in that order, or as the combined three-setting fix above, this is one of the more satisfying print defects to resolve properly, because the fix maps so cleanly onto an actual understood physical cause rather than requiring trial and error.