
If you print multi-colour models on a Bambu machine with AMS, you will have noticed the prime tower. That column of striped filament growing next to your actual model, layer by layer, consuming material that goes straight in the bin when the print finishes. On simple two-colour prints it is a minor nuisance. On complex prints with many colour changes across dozens of layers, it can account for a significant proportion of the total filament used — sometimes rivalling the model itself.
The prime tower is not something you can simply turn off without consequences. It serves a real purpose: purging contaminated filament from the nozzle after each colour change so the next colour prints clean. But the default settings in Bambu Studio are deliberately conservative, and there is a meaningful gap between the default waste and the minimum waste achievable with thoughtful configuration. This guide covers every method available in Bambu Studio to reduce that gap, with specific settings, where to find them, and what each one trades off.
Why the prime tower exists
When the AMS switches filament, the previous colour does not vanish cleanly from the nozzle. The melt zone holds molten material and the walls of the hotend retain a film of the previous colour. If the printer returned directly to the model after a filament change, those first few millimetres of the new colour would be contaminated — visible as a discoloured smear or layer on the print.
The prime tower solves this by giving the nozzle somewhere to deposit that contaminated filament. The nozzle extrudes back and forth across the tower until the old colour has been purged and the new colour is running clean, then returns to the model. The tower is a controlled sacrificial structure. Without it, or without an equivalent purge mechanism, colour bleeding onto the model is the result.
Bambu Studio calculates the required flush volume for each colour change pair automatically, based on two factors: the colours involved and the material properties. Dark-to-light transitions require significantly more purging than light-to-dark, because a small amount of dark contamination in a light colour is visually obvious, while the reverse is not. The calculated volumes are conservative by design — Bambu prioritises print quality over filament efficiency in the defaults.
Understanding the prime tower settings in Bambu Studio
Before diving into reduction methods, it is worth knowing where the relevant settings live. The prime tower and flushing controls are spread across three places in Bambu Studio:
- Project Filaments panel — the Flushing Volumes button, which opens the per-pair flushing volume table and the global multiplier
- Others tab (in Print Settings) — flush into infill, flush into support, and flush into objects settings
- Filament settings (per filament, since Studio 2.0) — prime volume per filament, which controls the volume deposited on the tower per switch for that specific filament
The prime tower itself — its width, position, and whether it is enabled at all — is controlled in the Others tab. The flushing volumes (how much material is purged per colour change) and the prime volume (how much of that purge goes onto the tower specifically) are separate parameters that work together.
Method 1 — Use sparse infill in the prime tower
This is the most impactful single setting change for reducing prime tower filament consumption, and it is one that many users miss entirely because it is not obviously labelled.
By default, the prime tower prints its interior at full density — the lines are packed tightly across the full width of the tower on every layer. The tower needs to be structurally stable enough not to fall over during a long print, and the dense fill achieves this. But density well above structural minimum is waste. The nozzle does not need to fill the entire tower to purge effectively — it only needs to deposit enough material to flush the contaminated filament. The rest of the tower area is being printed unnecessarily densely.
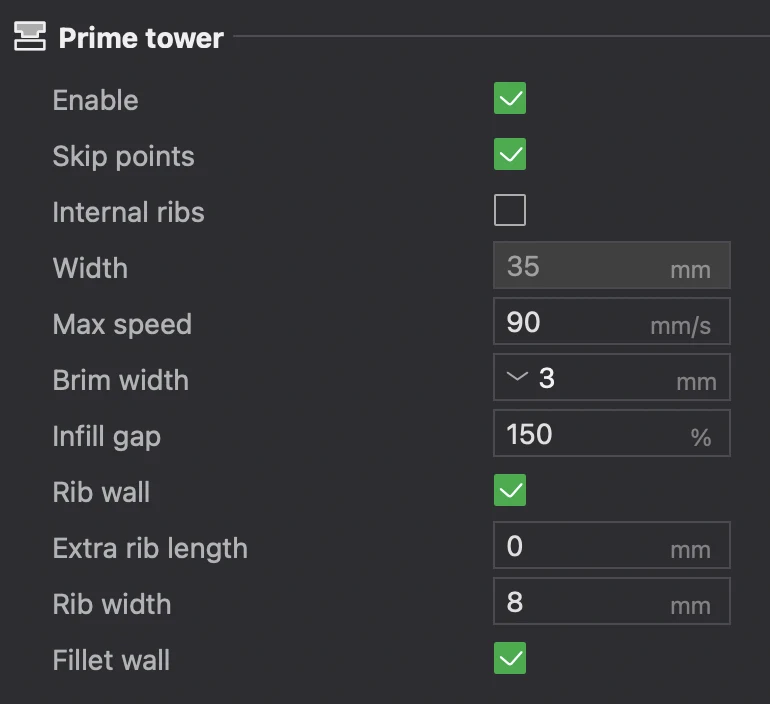
Bambu Studio’s prime tower has an infill gap setting that controls the spacing between the lines printed inside the tower. The line gap of the prime tower filling part can be manually set. This parameter represents the spacing between the centre lines of two lines. Properly increasing the infill gap can help reduce printing problems caused by filament expansion or accumulation. The default value is 150%, that is, the distance between the centre lines of the two traces is 1.5 times the line width, so the interval between the two traces is 0.5 times the line width.
Increasing this value — pushing the line gap to 200% or 250% — creates a sparser prime tower interior. The structural walls of the tower remain solid. The infill between them uses less material. The purge function is not affected because the purge lines are still deposited; they are just spaced further apart. The tower remains stable because the outer perimeter walls hold the structure, not the infill density.
To find this setting: in Bambu Studio, go to Print Settings, then the Others tab. Look for Prime Tower and expand its settings. The line gap or infill spacing parameter is listed there. Start at 200% and slice to compare the tower material estimate in the preview against your default. On a complex multi-colour print, this change alone can reduce tower material by 20–35%.
Method 2 — Flush into infill
This is Bambu Lab’s own recommended approach for models where the infill will not show through the walls. Instead of routing all purged filament to the prime tower, Bambu Studio can redirect some of the flush volume into the infill of the model itself. The contaminated filament from the colour change is used to print a section of internal infill rather than going into the tower. Since the infill is entirely hidden inside the model by wall perimeters and top/bottom layers, the mixed colour is invisible in the finished print.
The setting is called Flush into objects’ infill and is found in the Others tab of Print Settings. It is a checkbox — enable it and Bambu Studio will divert flush material into infill regions wherever possible during slicing.
The important caveat: this setting must be used cautiously, as some filaments — lighter colours and transparent colours — will allow the oddly coloured infill printed with this enabled to show through and affect the appearance of the part from the outside. Similarly, the smaller the number of wall loops and shell layers that a part has, the more likely it is for odd infill colouring to show. For opaque filaments with three or more wall loops and a reasonable number of top layers, flush into infill works cleanly with no visual impact. For silk PLA, translucent filaments, or models with thin walls, check the layer preview carefully before committing to a print.
The reduction from this method is proportional to the model’s infill volume relative to the number of colour changes. For a large, thick model with high infill, the saving is substantial. For a thin-walled decorative model with minimal infill, the impact is limited — there is simply not enough infill area to absorb much of the flush volume.
Method 3 — Flush into support
The same principle as flush into infill, applied to support structures. If your print uses supports, Bambu Studio can route a proportion of the flush material into the support geometry rather than the prime tower. Since supports are removed after printing, the mixed-colour material in them is entirely irrelevant — it goes in the bin either way, but at least some of it was used for a structural purpose rather than being pure tower waste.
For models with large area supports, enabling this option can reduce a lot of material waste and shorten the printing time. The main drawback to this approach is that there is often not enough support in a print to make a large difference. Since there are no real negatives, it is enabled by default. The setting lives in the Others tab alongside flush into infill. Leave it enabled unless you have a specific reason to disable it — on models with significant support geometry, it costs nothing and recovers some material.
Method 4 — Reduce the flushing volume multiplier
Bambu Studio’s auto-calculated flushing volumes are conservative. They are designed to guarantee clean colour transitions under a wide range of conditions. For many colour combinations — particularly light-to-dark transitions, or same-material switches between similar colours — the default volumes are more than actually required for a clean result.
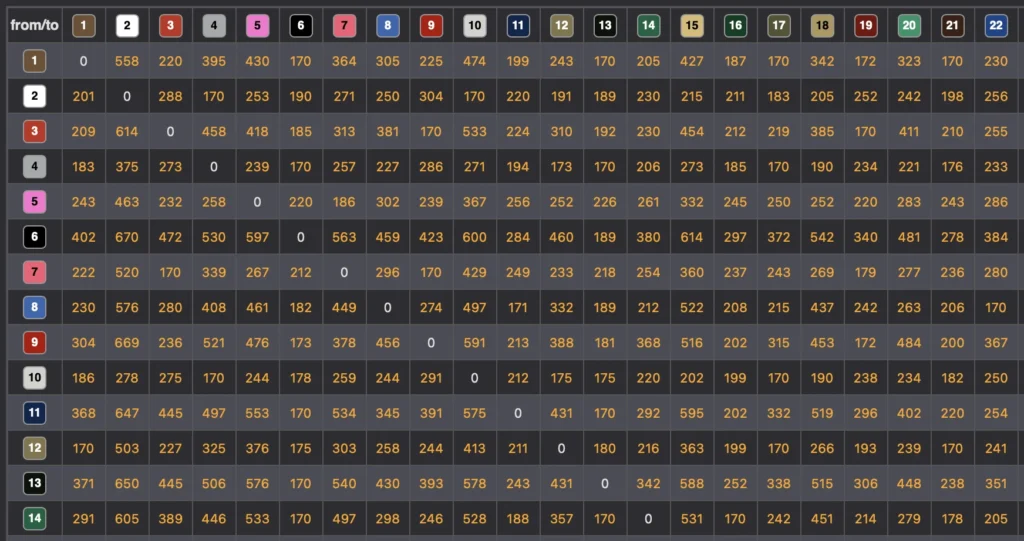
The flushing volumes panel is accessible by clicking the Flushing Volumes button in the Project Filaments section of the preparation screen. It shows a matrix of from/to filament pairs, each with a calculated flush volume in mm³. At the top of that panel is a Multiplier field. A multiplier of 1.00 is the default, with 0.90 being 10% less flushing volume for every filament change pair.
Reducing the multiplier to 0.80 or 0.70 is a reasonable starting point for most colour combinations. Reducing the multiplier to at least 0.60 or even 0.40 is viable. Light colours going into dark colours can have really small numbers — white going into black, for example, can be reduced significantly. The risk of going too low is visible colour contamination on the model: a smear or discoloured layer where the transition was not fully purged. Always run a test print at a reduced multiplier before using it on a complex or important job.
The from/to values in the matrix can also be edited individually. This is more granular than the multiplier and worth using when you have a specific colour pair that you know from experience needs less purging than the default calculates. A dark-to-dark transition that Bambu has calculated conservatively can often be reduced individually without affecting the other pairs in the job.
Method 5 — Use flush objects
Flush objects are the most powerful waste reduction technique available in Bambu Studio, and the least used — primarily because it requires a deliberate workflow step that most users skip. The concept is that instead of routing purged filament into the prime tower, you route it into the infill of a separate object placed on the build plate alongside your main model. That separate object — the flush object — serves no other purpose than to absorb purge material, and it prints using filament that would otherwise be waste.
To set up a flush object, add a simple model to the build plate alongside your main print. It does not need to be anything specific — a cube, a cylinder, or any object of similar height to the main model works. Right-click the model on the build plate and enable Flush into this object. Bambu Studio will then use the infill of that object to absorb purged filament from colour changes, dramatically reducing what ends up in the prime tower.
The Bambu Cube would normally require about 70g of flushed filament, but since we are instead using that filament for the flush objects, the flushed filament is instead less than a gram. Also consider that flush parts which are taller than the multimaterial parts will use new filament to print the rest of their height, so flush parts which are a similar height to the multimaterial parts are ideal.
The practical workflow: if you are regularly printing the same multi-colour model, add a simple flush object of similar height and keep it in the 3MF alongside the main model as a standard plate layout. The flush object will not win any design awards but it will slash your waste. This hidden feature — turning your model into a purge tower — can be a game-changer in minimising filament waste. A stripy, mixed-colour object on the plate is the flush object doing its job.
An additional advantage: if you are printing multiple copies of the same model, adding them all to a single plate serves a similar purpose. With multiple models on the plate, purge material gets distributed across all of them, and the total waste is lower than printing each copy individually because the colour changes serve multiple models simultaneously.
Method 6 — Reduce the prime tower width
The prime tower width is a directly adjustable parameter in Bambu Studio, found in the Others tab under Print Settings. Reducing it from the default makes the tower physically narrower, which reduces the footprint it occupies on the build plate and can reduce material use on prints with fewer colour changes per layer.
The relationship between width and material is not linear. The number of turns equals the length to be printed for each filament change divided by the width of the prime tower, indicating how many times it needs to turn back and forth on the prime tower during the filament change. Tower depth for each filament change equals the number of turns multiplied by line width. The total depth of the single-layer tower equals the number of turns multiplied by line width, multiplied by the number of filament changes in that layer. This means a narrower tower compensates by becoming deeper — the same volume of material is deposited across a smaller footprint but greater depth. Material saving from width reduction alone is therefore limited.
Where width reduction matters more is stability. A tower that is too narrow for its height will wobble and eventually tip, particularly on tall prints. Bambu Studio enforces a minimum depth to prevent the tower from becoming dangerously narrow. Do not push the width below what the slicer is willing to enforce as a minimum — the stability warning in the preview is real.
The most effective use of width reduction is in combination with the other methods. Reducing width slightly, combined with sparse infill and flush into infill, produces a smaller and less wasteful tower than width reduction alone.
Method 7 — Reorient the model to concentrate colour changes at the base
This is a design-level technique rather than a settings change, but it is documented by Bambu Lab’s own wiki as one of the most effective waste reduction approaches available.
The prime tower grows with the model. It must reach the highest layer on which any colour change occurs. Since the prime tower must reach the highest layer with a filament change, prints with changes only near the top waste clean filament to provide the tower’s foundation up until it is needed. Conversely, if changes occur only near the bottom, the tower stops early once it’s no longer needed.
The practical consequence: if your model has most of its colour changes in the lower half — base, feet, lower body — and a single colour for the upper portion, the prime tower only needs to grow to the height of the last colour change, not the full height of the model. Rotating the model upside down, if the geometry permits it, can move the high-transition zone to the bottom layers and dramatically reduce tower height. Rotating the same part upside down so that the filament changes were all on the bottom reduced the prime tower material to 9.05g — about 40% less material — because the tower can now be much smaller.
Not every model can be rotated without affecting print quality or support requirements. But for models where the orientation is flexible — a figure that can print either head-up or head-down, for example — checking which orientation concentrates the colour changes lower down is worth the few seconds it takes in the slicer.
Method 8 — Print multiple copies on the same plate
This is the simplest method and often overlooked. The prime tower overhead is largely fixed per print job, not per copy of the model. Adding two, three, or four copies of the same model to the build plate increases total model output without proportionally increasing the prime tower size or the total flushing volume. The colour changes serve all the copies on the plate simultaneously, so the waste per model decreases as the number of copies increases.
For regularly printed items — gifts, functional parts, display pieces that you print repeatedly — this habit alone reduces your effective waste-per-model significantly. The prime tower will be slightly larger than for a single copy (because there is more infill and support to flush into, and slightly more material change volume), but the scaling is heavily in your favour. Four copies with one prime tower is dramatically more efficient than four single prints each with their own tower.
All methods at a glance
| Method | Where to find it in Bambu Studio | Typical saving | Trade-off / caveat |
|---|---|---|---|
| Sparse prime tower infill | Print Settings → Others → Prime Tower → Line gap (increase above 150% default) | 20–35% tower material | None significant — tower remains structurally stable |
| Flush into infill | Print Settings → Others → Flush into objects’ infill (checkbox) | Varies — proportional to infill volume | Risk of colour bleed through thin walls or translucent filament |
| Flush into support | Print Settings → Others → Flush into support (checkbox — enabled by default) | Minor — only applies when supports are present | None — supports are waste anyway |
| Reduce flushing multiplier | Project Filaments panel → Flushing Volumes button → Multiplier field | 10–40% of purge volume depending on multiplier | Risk of visible colour contamination if reduced too aggressively |
| Flush objects | Right-click any model on build plate → Flush into this object | Up to 95%+ of purge volume — the most impactful method | Requires an extra model on the plate; flush object must match print height |
| Reduce prime tower width | Print Settings → Others → Prime Tower Width | Limited alone — combine with sparse infill | Too narrow causes tower instability on tall prints |
| Reorient model | Manual rotation in the slicer viewport — move colour changes to lower layers | Up to 40% tower material on suitable models | Not always possible without affecting print quality or support requirements |
| Print multiple copies per plate | Duplicate models on build plate | Proportionally reduces waste per model | Requires build plate space and longer print time per session |
Recommended starting configuration
Rather than applying all of these methods simultaneously on the first run — which makes it difficult to diagnose if something goes wrong — start with the three changes that carry the lowest risk and combine well with each other:
- Enable Flush into objects’ infill (Others tab) — low risk, no visual impact on opaque filaments with standard wall counts
- Enable Flush into support (Others tab) — already enabled by default, confirm it is on
- Increase the prime tower line gap to 200% (Others tab → Prime Tower settings) — reduces infill density in the tower with no structural downside
Slice the job and check the filament usage estimate in the preview. Compare it to your previous default. The difference is the material recovered by those three changes alone.
From there, consider the flushing multiplier reduction as a second step. Start at 0.80 and run a test print with your specific colour combination. Check the result at the layer where each colour change occurs — look closely at the first few layers of each new colour for any visible contamination. If clean, try 0.70. Find the floor for your specific filament set and lock it in as your configuration for that combination.
If you regularly print the same multi-colour model and waste is a significant concern, add a flush object to the plate permanently. A simple 20mm cube set to flush into this object, positioned in a corner of the build plate at a similar height to the model, will absorb the majority of your purge volume and leave the prime tower as a minimal structural aid rather than the primary purge destination.
A word on colour-pair logic
One thing worth understanding before reducing flushing volumes: not all colour transitions are equivalent. The from/to direction matters significantly. Transitioning from white to black requires far less purging than transitioning from black to white — a small amount of white contamination in a subsequent black print is invisible, while even a trace of black in a white layer is visible. Bambu’s auto-calculated matrix accounts for this: the white-to-black cell in the flushing volume table will have a lower value than the black-to-white cell.
When reducing flushing volumes manually, do not apply the same reduction uniformly to all pairs. Reduce the light-to-dark transitions aggressively — they can often tolerate very low values — and be more conservative with dark-to-light transitions. This per-pair tuning gives you the best overall efficiency without accepting visible contamination on the transitions that actually matter.
Summary
Prime tower waste is a real cost of multi-colour printing on single-nozzle Bambu machines, but the default settings are not the only option. Increasing the prime tower infill gap reduces tower density without affecting stability or purge quality. Flush into infill and flush into support redirect purge material into geometry that was being printed anyway. Reducing the flushing multiplier cuts the volume per change once you have validated the minimum for your specific colour combinations. Flush objects can recover almost all purge volume on jobs where build plate space allows. And model orientation — concentrating colour changes in the lower layers — can reduce tower height by 40% on suitable models without touching a single setting.
None of these methods require you to compromise print quality if applied with the appropriate care. Used together, they can reduce prime tower and purge waste from a significant proportion of a multi-colour print’s total filament consumption to a fraction of that. For anyone printing multi-colour models regularly, the time spent configuring these settings once pays back in filament savings on every subsequent job.