The top surface of a 3D print is the face that people see first. Every layer line, every small gap between extrusion passes, every slight ridge where the nozzle changed direction — they are all visible on a flat top surface in a way that they are not on walls or curved geometry. For functional parts it rarely matters. For display pieces, gifts, and anything going on a shelf, it can be the difference between a print that looks considered and one that looks obviously printed.
Ironing is Bambu Studio’s solution to this. It adds a post-processing pass at the end of every top layer, running the nozzle back over the surface it just printed at low flow and low speed, using the heat of the hotend to melt and level the surface. Done well, the result is a smooth, almost injection-moulded top face with no visible layer lines. Done poorly — with settings that do not suit the filament or the model — it can make the surface worse rather than better, adding blobs, ridges, or a glazed sheen that looks odd.
This guide covers how ironing works, where to find the settings in Bambu Studio, a reliable starting point for PLA on the A1, and — crucially — which settings to tweak to dial it in for your specific filament. Because ironing is one of those techniques where the starting point gets you close, but the final result comes from experimenting with your own filament on your own machine. Different filaments behave differently under the iron, and what works perfectly for one spool may need significant adjustment for the next.
How ironing actually works
The ironing function is like ironing out wrinkles on clothing, eliminating lines on the top of the model and making the top look smoother. After printing the top surface of the model, the nozzle continues to print on the model’s surface with a small flow rate at the same height, allowing a small amount of extruded material to penetrate between the lines and fill the gaps. During the ironing process, because the Z height of the nozzle is not raised, the heat of the nozzle across the top layer softens the top lines, and the small amount of extruding material can easily fill and smooth the top layer.
The key detail in that explanation is that the nozzle does not raise its Z height for the ironing pass. It stays at the same level it was when printing the last top layer, which means it is physically dragging across the surface it just deposited. The combination of radiated heat from the hotend softening the material below it and a small trickle of extrusion filling the gaps between lines is what levels the surface. Think of it less like a hot iron pressing down on fabric and more like a warm roller gliding across still-soft material.
The ironing pass only operates on top surfaces — it cannot iron side walls or overhangs, because the nozzle faces down and can only make contact with horizontal faces. This is worth knowing before enabling it: ironing improves flat top faces specifically, and has no effect on the overall surface quality of walls or curved vertical geometry.
Where to find ironing settings in Bambu Studio
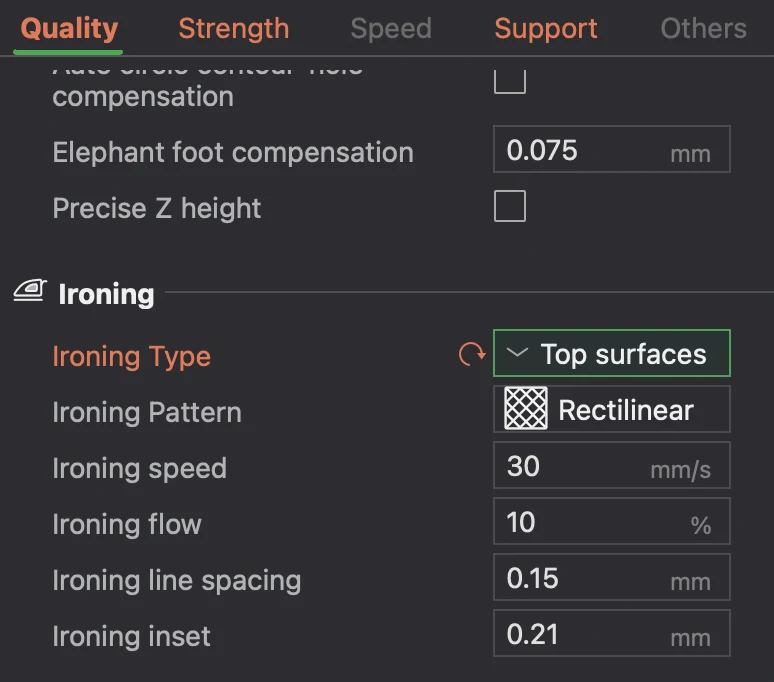
Ironing is not enabled by default in Bambu Studio. To access it, go to Process settings and select the Quality tab. The ironing controls are grouped together under the Ironing section. You will need Advanced mode enabled to see the full set of parameters — if you only see basic options, check that Advanced is selected in the Process menu at the top.
The ironing parameters explained
Ironing Type
This controls which surfaces receive the ironing pass. Three options are available:
- Topmost surface only — irons only the highest top layer of the model. The most commonly useful setting. Use this for display pieces where only the very top matters and you want to minimise print time impact
- All top surfaces — irons every top surface across the entire model, including mid-height flat faces and any internal horizontal surfaces. Use this when the model has multiple distinct top faces that will all be visible — stepped models, layered designs, objects with internal flat shelves
- All solid layers — irons every solid layer including tops, bottoms, and solid infill. Rarely useful and adds significant print time without a proportionate quality benefit. Generally not recommended
For most use cases, start with Topmost surface only. If you have a model with multiple top faces you care about, switch to All top surfaces.
Ironing Pattern
Two patterns are available: Rectilinear and Concentric. Rectilinear runs straight parallel lines back and forth across the surface — the standard default and the right choice for most models. Concentric runs the ironing pass in rings from the outside inward, following the shape of the surface perimeter. Concentric can produce a distinctive visual result on circular or organic top surfaces, where the rings emphasise the shape rather than cutting across it. For square and rectangular surfaces, rectilinear is almost always preferable.
Ironing Flow Rate
This is the amount of filament extruded during the ironing pass, expressed as a percentage of normal extrusion. It is the most impactful single setting for ironing quality and the one that needs the most attention when dialling in a new filament.
The default in Bambu Studio is 10–15%. This is deliberately conservative — enough to fill gaps without overflowing and creating blobs on the surface. For many PLA filaments, 15–20% is where the smoothest result sits. Too low and the gaps between lines are not filled and the surface still shows texture. Too high and excess material builds up on the surface, the nozzle drags through it on the next pass, and you get ridges, streaks, or a glossy blotchy finish worse than no ironing at all.
Community testing on MakerWorld’s ironing calibration cards suggests the useful range for most PLA on a 0.4mm nozzle is 15–30%. Ironing defaults clarified for a robust starting point: 40mm/s speed, 20% flow. Start at 15% and work up in 5% increments until the surface looks right. Silk PLA typically needs less flow than standard PLA — the material flows more readily and overflows at flow rates that standard PLA handles cleanly. PETG is particularly sensitive to flow rate — too much and the material blobs rather than levels.
Ironing Speed
The speed at which the nozzle moves during the ironing pass. A slower speed can obtain a better ironing effect because the nozzle spends more time over each section of the surface, transferring more heat and giving the extruded material more time to level. The trade-off is print time — a large flat top surface ironed at 30mm/s takes considerably longer than the same surface at 60mm/s.
The practical range is 30–80mm/s for most PLA work. The Bambu wiki suggests slower for better results; community calibration testing places the useful window at 15–60mm/s for fine tuning. Start at 40mm/s as a reliable middle ground. If the surface still shows texture, reduce speed before increasing flow — slower ironing often resolves issues that more flow would worsen.
Ironing Line Spacing
The distance between ironing passes across the surface, measured in mm. It is usually recommended to be smaller than the nozzle diameter so that the same area can be repeatedly ironed multiple times. For a 0.4mm nozzle, the default spacing is typically 0.1–0.15mm. Smaller spacing means more overlapping passes, more heat applied, and a smoother result — at the cost of more time. Larger spacing reduces time but may leave faint lines between passes visible on the finished surface.
For display pieces where surface quality is the priority, 0.1mm spacing produces excellent results. For functional parts where you want some improvement without significant time penalty, 0.15–0.2mm is a reasonable compromise. Do not go above 0.25mm for a 0.4mm nozzle — the passes become too far apart to level effectively and you start to see the ironing lines rather than a smooth surface.
Ironing Inset
Added in Bambu Studio version 1.10, the ironing inset pulls the ironing area slightly away from the edge of the surface, avoiding the material accumulation that can occur at the perimeter when the nozzle changes direction. By adjusting the ironing inset, the ironing area can be adjusted appropriately to avoid this issue. The parameter value is in mm, representing the distance between the ironing area and the edge, and 0 indicates disabling. Note that this setting requires Develop mode to be enabled in Preferences — it is not visible in standard Advanced mode.
A value of 0.2–0.3mm is a useful starting point if you are seeing material building up at the edges of ironed surfaces. If your ironing results look clean to the edge without inset, leave it at 0.
Suggested starting point for PLA on the Bambu A1
Here is a reliable starting configuration for ironing on PLA+ with a 0.4mm nozzle at 0.2mm layer height. These are not the definitive correct settings — they are a tested starting point that produces good results and gives you a stable baseline to adjust from.
| Setting | Starting value | Notes |
|---|---|---|
| Ironing Type | Topmost surface only | Switch to All top surfaces if the model has multiple flat top faces you care about |
| Ironing Pattern | Rectilinear | Concentric is worth trying on circular or organic top surfaces |
| Flow Rate | 15% | Increase in 5% increments if gaps remain visible. Drop to 10% if blobs or ridges appear |
| Speed | 40 mm/s | Reduce to 30mm/s if surface still shows texture. Increase to 60mm/s if time is a concern and results are already clean |
| Line Spacing | 0.15 mm | Reduce to 0.10mm for display pieces where surface is the priority |
| Ironing Inset | 0.2 mm | Enable in Develop mode if edge material accumulation is visible. Leave at 0 if not needed |
How to dial it in: the tuning sequence
Here is the honest truth about ironing: the starting point gets you close, but the perfect result comes from testing with your specific filament on your specific machine. Results will be different for different filament types and often also different filaments — sometimes even for the same brand and product but different colour. This is not a flaw in the technique; it is the nature of working with a process that is sensitive to the material’s viscosity at temperature, and that changes between filament formulations, colours, and even batches.
Rather than running full prints to test ironing, use a small flat calibration model. A 50 × 50 × 3mm box is enough surface area to evaluate the ironing result clearly without wasting significant filament or time. Print the same tile multiple times with one variable changed at a time. Adjust flow first, then speed, then spacing — in that order.
Step 1 — Dial in flow rate first
Start at 15% flow. If the surface still shows the texture of the underlying top layer — the parallel ridges from the top surface passes — the flow is too low. Increase by 5% and print again. You are looking for the point where those ridges disappear and the surface reads as flat. If blobs, streaks, or a glazed uneven sheen appear, the flow is too high — reduce by 5% and try again. The correct flow rate is the minimum at which the surface looks smooth. More flow beyond that point does not improve the result; it degrades it.
Step 2 — Adjust speed
Once the flow rate is producing a good result, check whether reducing the speed improves things further. Drop from 40mm/s to 30mm/s and compare. If the result is visibly better, keep it. If it looks the same, use the faster speed — the time saving on large surfaces is meaningful and there is no point running slower than necessary. If your surface has slight ripples or inconsistencies in the ironing pass, slower speed often resolves them before any other adjustment.
Step 3 — Refine line spacing
If the surface looks good at 0.15mm spacing but you can still see faint parallel lines under raking light — the kind you only notice when you tilt the part at a specific angle — reduce spacing to 0.10mm. This increases print time for the ironing pass but removes the residual texture. For display pieces photographed or displayed under direct light, 0.10mm spacing produces a noticeably cleaner result than 0.15mm.
Step 4 — Check the edges
After getting the centre of the surface right, inspect the edges of the ironed area. If material is building up at the perimeter — a slight raised ridge where the nozzle turns around — enable ironing inset at 0.2mm. This pulls the ironing passes slightly away from the edge and prevents the accumulation. Not every filament or flow rate combination produces this; check before enabling it rather than adding it by default.
Material-specific notes
PLA and PLA+
The most forgiving material for ironing. Standard PLA+ on the A1 with the settings above produces excellent results without significant tuning. Start at 15% flow and 40mm/s. Most PLA+ colours settle between 15–25% flow — darker colours can sometimes need slightly more flow than lighter ones to achieve the same visual result, because the texture reads more prominently against a dark surface. Matte PLA is worth noting separately: it irons well but the result is a more satin finish rather than the semi-gloss that standard PLA produces. Both are attractive — they are just different characters.
Silk PLA
Silk PLA flows more readily than standard PLA at the same temperature. Start at 10% flow rather than 15% — the material is more likely to overflow and blob than to under-fill. Speed can typically stay at 40mm/s. The ironed result on silk PLA is particularly striking because the metallic sheen is enhanced by the levelled surface; the reflective quality becomes more consistent and the overall appearance approaches a polished cast metal look. Worth the extra print time on any silk display piece.
PETG
PETG irons but requires care. Because the ironing process uses only a small amount of extrusion flow and a slow printing speed, there is a certain probability of thermal creep, which can lead to hot end blockage, especially for materials with low softening temperatures such as PLA, PETG, and TPU. PETG’s tendency to string and blob is amplified during the low-speed, low-flow ironing pass. Start at 10% flow, 50mm/s speed, and monitor the first few layers carefully for blobbing around the nozzle. If blobs appear and get dragged across the surface on the next pass, reduce flow or increase speed. Some PETG formulations iron cleanly; others do not respond well regardless of settings. If PETG ironing is consistently poor on your specific filament, it is worth trying a different brand before concluding the technique does not work.
PLA-CF
Carbon fibre PLA irons poorly. The chopped fibres in the material resist the levelling action that makes ironing effective on standard PLA, and the matte black surface makes assessing the result difficult. The as-printed surface finish of PLA-CF is already quite good — the matte texture conceals layer lines naturally — and ironing is rarely worth attempting. Skip it for PLA-CF and accept the natural surface finish.
When ironing is not the answer
Ironing improves the top surface finish but it is not the only lever available, and it is sometimes not the right one.
If the top layer has gaps, holes, or rough patches caused by insufficient top layer count or too-low infill, ironing will not fix them. It can smooth a surface but it cannot fill structural voids. Address top layer count and infill first — typically three to four top layers minimum, and infill of at least 15% — before ironing. Ironing over an inadequately supported top surface produces a shiny rough result rather than a smooth one.
If the overall print quality is inconsistent — inconsistent extrusion, stringing, or poor calibration — ironing amplifies these issues rather than hiding them. Calibrate flow rate and pressure advance for your specific filament before adding ironing. The MakerWorld ironing calibration card workflow recommends: temperature tower first, then pressure advance, then flow rate, then ironing. That sequence matters.
For models where the top surface is textured by design — a model with a deliberately rough surface, a wood-effect print, or anything where the top layer lines contribute to the intended aesthetic — ironing removes exactly the characteristic that makes the surface interesting. Ironing is for smooth surfaces. Leave it off for anything that benefits from texture.
Print time impact
Ironing adds time. On a small model with a modest top surface area, the impact is negligible. On a large flat model — a name sign, a phone stand, a display plinth — ironing at 30mm/s with 0.10mm spacing on a 150 × 100mm surface can add 20–40 minutes to the print time. Check the time estimate in the Bambu Studio preview before committing. The time cost is usually worth it for display-facing surfaces. For functional parts where you will never look at the top, it is not.
The practical workflow: use Topmost surface only for most prints, which limits the ironing pass to the final top layer. Use All top surfaces only when multiple faces genuinely need the treatment. Reserve the fine-spacing, slow-speed settings for prints where the top surface quality is central to the finished result.
Summary
Ironing is one of the most effective surface quality improvements available in Bambu Studio and one of the most underused. Enable it on any print where the top surface finish matters, start with 15% flow and 40mm/s speed, and adjust from there based on what you see. Flow rate is the primary variable — get that right first before adjusting anything else. Speed refines the result once flow is dialled in. Line spacing is the final quality lever for the highest-demand display work.
The most important thing to take away is this: what works for one filament will not necessarily work for the next. Silk PLA behaves differently to standard PLA. PETG behaves differently again. Even the same filament in different colours can need small adjustments. Treat the starting point as exactly that — a starting point — and expect to spend a few short calibration prints finding the right settings for each material you iron regularly. Once you have found them, note them down and apply them consistently. The results are worth it.