Multi-colour 3D printing has clearly crossed a threshold over the past couple of years. What was once seen as experimental or niche is now firmly part of the mainstream, and it is no longer limited to novelty pieces or display models. With the rise of systems such as AMS-style filament switching, tool changers, and multi-nozzle setups, the barrier to entry has dropped significantly. Anyone running a modern printer can now produce parts in four, eight, or even more colours within a single print job, something that would have been impractical or prohibitively complex not long ago.
However, the reality on the ground is a bit more nuanced. Despite the accessibility of the technology, a large proportion of users are not getting real value from it. This is not due to a lack of understanding of how the feature works, but rather how it is being applied. Multi-colour printing is often used in ways that increase print time, waste material, and add complexity without delivering meaningful benefit to the final part. The issue is not the capability itself, but the decision-making around when and how to use it.
This post focuses on that distinction. The aim is to cut through the novelty factor and look at multi-colour printing as a practical tool. Where does it genuinely improve a print? Where does it introduce unnecessary overhead? And how do you approach it in a way that delivers clean, functional results without burning through time and filament unnecessarily?
What Multi-Colour Printing Actually Is (And Isn’t)
At a technical level, multi-material printing simply means switching materials or colours during a print to create variation in the final object.
In FDM, that usually means one of three approaches:
- Single nozzle with filament switching (AMS-style)
- Dual or multi-nozzle systems
- Full tool changer systems
Each comes with trade-offs.
The big one that matters most in real-world use:
Material waste and time overhead
Single-nozzle systems, which most people are using, have to purge filament between colour changes. That’s not optional. It’s required to prevent contamination in the melt zone .
And the impact is not trivial:
- Print times increase significantly
- Filament usage increases sharply
- Waste can exceed the printed part in some cases
That’s the part most people underestimate.
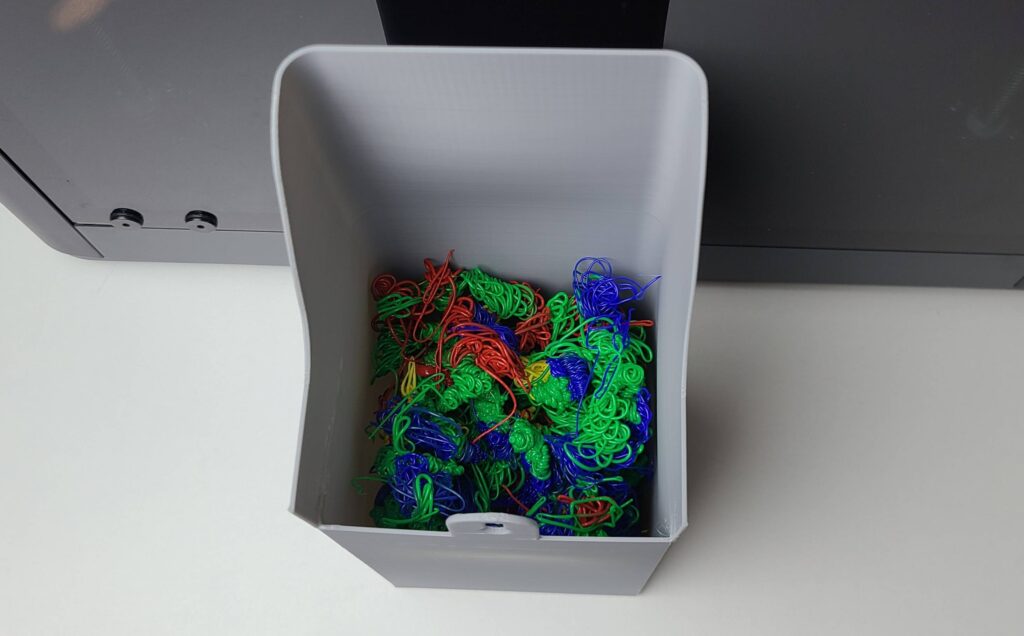
The Big Problem: Waste (And Why It Matters More Than You Think)
Let’s be blunt.
Multi-colour printing can be incredibly wasteful.
Real-world examples show situations where:
- A 28g part produces over 100g of waste
- Purge towers outweigh the actual model
And this lines up exactly with what you’ll see in practice.


This isn’t just a cost issue.
It’s:
- Time (longer prints)
- Reliability (more failure points)
- Environmental impact (waste plastic)
There’s a growing push towards recycling and waste reduction in 3D printing, but it’s still not widely solved at a hobby level .
So using multi-colour properly isn’t just optimisation. It’s discipline.
Where Multi-Colour Printing Actually Makes Sense
This is where most people get it wrong.
They treat colour like decoration.
The real value is functional separation.
1. Labels and Readability
This is the best use case. Full stop.
- Panel labels
- Switch indicators
- Measurement markings
- Tool identifiers
Instead of stickers, paint, or engraving, you get:
- Permanent
- Clean
- Zero post-processing
And importantly:
Minimal colour changes per layer
Which means:
Minimal waste
2. UI and Interface Parts
Think:
- Control panels
- Knobs with indicators
- Enclosures with legends
This is where multi-colour printing becomes genuinely useful.
It replaces:
- Laser etching
- Vinyl overlays
- Manual finishing
3. Functional Segmentation
This is underrated.
Using colour to indicate:
- Assembly orientation
- Part grouping
- Load zones
- Safety indicators
Not aesthetic. Functional.
4. Branding (Done Carefully)
Logos, accents, product-style finishes.
But only when:
- Colour changes are limited
- Geometry supports efficient transitions
Otherwise it becomes expensive fast.
Where It’s a Waste of Time
1. Full-Body Colour Prints
Printing a model that changes colour constantly across layers?
Worst case scenario:
- Maximum purge
- Maximum time
- Maximum failure risk
Looks great on Instagram. Makes zero sense in practice.
2. “Because I Can” Printing
This is the trap.
Adding colour:
- With no functional benefit
- Just to use AMS
That’s how you end up doubling print time for no gain.
The Hardware Reality (2026 Direction)
The industry knows this is a problem.
New systems are actively trying to solve:
- Waste reduction
- Faster switching
- Multi-nozzle efficiency
For example:
- Dual nozzle systems reduce purge waste significantly
- Tool changers eliminate purge almost entirely in some cases
- New printer designs aim to reduce “printer poop” altogether
Even so, the dominant consumer setup right now is still:
- Single-nozzle filament switching
Which means the problem hasn’t gone away.
Practical Strategy: How I Actually Use Multi-Colour
This is the bit that matters.
Rule 1: Minimise colour transitions per layer
Less switching = less waste
Rule 2: Use colour for information, not decoration
Labels beat aesthetics every time
Rule 3: Combine colour zones vertically where possible
Avoid constant switching within the same layer
Rule 4: Accept that some prints should stay single colour
Not everything needs it
The Reality Check
Multi-colour printing is not a gimmick anymore.
It’s:
- Powerful
- Useful
- Increasingly standard
But it’s not free.
There is always a trade-off:
- Time
- Material
- Complexity
The people getting real value from it are not printing rainbow dragons.
They’re printing:
- Better tools
- Better parts
- Better systems
And they’re doing it efficiently.
Final Thoughts
Multi-colour 3D printing is no longer something to be dismissed as a novelty feature, but it also isn’t something that should be applied indiscriminately. It sits in a space where it can either add genuine, practical value or quietly erode efficiency depending on how it is used. Every colour change carries a cost in time, material, and complexity, and those costs compound quickly if the approach is not deliberate. The key is to treat multi-colour as a functional tool rather than a visual upgrade. When it is used to improve readability, usability, or part function, it can replace additional processes and produce cleaner, more professional results straight off the bed. When it is used without purpose, it tends to do the opposite, increasing print time and waste without improving the outcome. The difference comes down to intent and control. Used properly, it becomes part of an efficient workflow. Used casually, it becomes an expensive habit.