
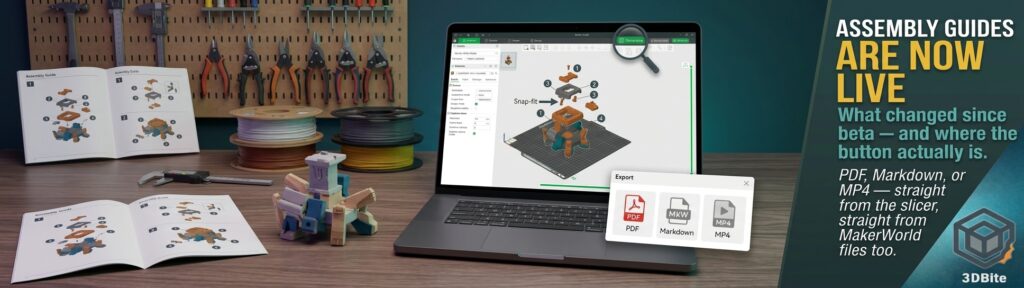
All3DP’s Carolyn Schwaar covered this on August 20, 2026 — Bambu Studio Can Now Build Assembly Guides for Your Models — with a tagline that gets straight to the point: “Explode. Explain. Impress.” Full credit to Carolyn and All3DP for flagging the update. That piece is brief, and this feature turns out to deserve more depth than a short news stub can give it — partly because I already covered an earlier version of it on this site back when it was still tucked inside the 2.8.0 beta, and partly because it has genuinely moved forward since then in ways worth explaining properly, pulling together Bambu’s own release notes, Fabbaloo’s hands-on coverage, and the German site 3Druck’s reporting alongside the All3DP piece.
What has actually changed since the earlier post
The earlier coverage of Bambu Studio 2.8.0 beta on this site described the Assembly Guide tool when it first appeared — STEP file import, automatic step splitting, X-ray and current-step-only viewing modes, snap-fit and rectangle and text annotations, exploded-view animation export. All of that is still accurate and still the core of the feature. What has moved forward is the version number and the polish: this is now shipping in the 2.8.2.60 public release rather than sitting exclusively in beta, which matters practically because the MakerWorld upload restriction that applied to beta-saved 3MF files no longer applies once the feature reaches a stable public release. Anyone who held off on the beta specifically because of that upload caveat can now use the assembly guide feature and continue publishing to MakerWorld from the same file without a workaround.
The public release also bundles a second, genuinely separate feature alongside it worth knowing about: Decompose Color. When importing a model or project carrying colour information, this lets you split any single colour into a combination of multiple colours and save the resulting overlaid effect as a new colour scheme — useful for anyone working with layered translucent filaments or building custom colour blends from existing painted models, though it is a distinct capability from the assembly guide tool and not something the earlier post touched on at all.
The detail that actually changes who this is for: it is not just for STEP files
This is the single most important clarification worth making, and it corrects something the earlier coverage on this site got slightly too narrow. Bambu’s own wiki page for the feature states its purpose directly: it helps professional creators who are used to working with STEP or STP files create assembly instructions more efficiently, while also supporting the creation of assembly guides for the large number of existing 3MF models already on MakerWorld. That second half matters enormously and was not clear from the beta release notes alone. The feature is not exclusively a CAD-to-slicer pipeline tool for people who own and use Fusion 360 or SolidWorks. It also works directly with the enormous existing library of pre-coloured, multi-part 3MF models already sitting on MakerWorld — exactly the kind of files behind the Mario series, the seasonal builds, and the World Cup keychains that have been featured across this site’s project posts.
Bambu’s wiki frames this explicitly as lowering the barrier to entry, allowing more beginner users to easily try creating assembly guides — a meaningfully different positioning from “a tool for engineers with parametric CAD files.” For anyone who downloads a multi-part model from MakerWorld and has ever wished the designer had included clearer assembly instructions than a paragraph of description text, this tool now offers a path to generate that documentation yourself, directly inside the slicer you are already using to prepare the print.
The bit that everyone reporting on this flags as a genuine usability problem
Fabbaloo’s coverage is unusually direct about this, and it is worth repeating because it will save real frustration for anyone trying to find the feature for the first time: it is kinda hidden in the interface. Bambu’s own wiki instructions dive straight into using the tool without clearly showing where to actually access it, and the icon for Assembly Guide is not immediately visible anywhere obvious in the toolbar. The trick, confirmed independently by both Fabbaloo and 3Druck’s coverage: after loading a STEP file (or an appropriate multi-part 3MF), click on the Overview feature. That is the entry point that launches the Assembly Guide wizard. If you have gone looking for a dedicated “Assembly Guide” button anywhere in the main toolbar and come up empty, this is why — the feature lives behind Overview rather than announcing itself as a standalone tool, and it is genuinely easy to miss on a first attempt without knowing this specific step in advance.
How the actual workflow runs, step by step
Pulling together the Bambu wiki’s own instructions with Fabbaloo’s hands-on account: export the model as a complete STEP file from your CAD software (or start from an existing multi-part 3MF for the MakerWorld route), and import it into Bambu Studio. The software automatically parses the file and converts it into a multi-part object, which you can then split into individual objects — a step that Bambu’s own documentation notes will greatly simplify the printing process on its own, independent of the assembly guide documentation that follows. The Assembly View generates automatically as part of this process.
From there, you can colourise the model within the assembly view by clicking a puzzle-piece-shaped icon on the far right of the toolbar, which helps visually distinguish parts from each other in the generated documentation. Working through the steps themselves, you assign the appropriate components to each stage, and can add notes, labels, or arrows to explain what is happening — Fabbaloo’s example is a text box with an arrow pointing at a specific important part, exactly the kind of annotation that turns a bare exploded view into genuinely useful instructions a stranger could follow without additional explanation. Steps can be reordered, edited, or modified freely as you refine the sequence, and the two viewing modes from the beta — X-ray for seeing through the assembly to internal components, and “show current step only” for isolating exactly what is relevant at each stage — remain available for positioning parts accurately as you build out the guide.
Once every step looks correct, the export button offers three formats: PDF for a printable, traditional instruction sheet; Markdown for pasting directly into a MakerWorld or Printables model description as formatted text; and MP4 for a genuine video walkthrough, generated with a single click using a unified camera view and automatic layout across the whole sequence — no manual camera work or video editing required on the designer’s part.
The one workflow trap worth knowing before relying on this for an evolving design
Bambu’s own wiki flags a specific gotcha that is easy to hit if a model is still under active revision in CAD rather than finished. When you make changes to the model design in your CAD software and re-import, you need to update the corresponding objects in the 3MF file’s assembly view carefully rather than simply deleting the obsolete objects and adding the new ones in their place. Bambu Studio has no way of knowing where newly added objects should sit in the previously built Assembly View, so a naive delete-and-replace approach disrupts the guide you have already built. The wiki lays out the correct update procedure explicitly, and anyone iterating on a design with an assembly guide already partway built should follow that specific method rather than assuming a fresh import will slot cleanly into the existing step sequence.
Why this genuinely matters for the multi-part printing case this site has been making
The multi-part printing post made the case that splitting a model into separately printed, hand-assembled colour parts frequently beats a single AMS job — cleaner colour separation, no purge waste, individually optimal print orientation, better repairability. The one honest limitation acknowledged in that post and revisited in the more recent SegviGen research post is that assembly documentation for multi-part models has always been an afterthought — a paragraph of description text if the designer bothered, nothing at all if they did not. A genuinely good multi-part model deserves genuinely good assembly instructions, and until now producing those instructions has meant a separate, manual effort in a presentation tool or video editor, entirely disconnected from the slicer where the model actually lives.
This feature closes that gap directly, and the clarification that it works with existing MakerWorld 3MF models — not only fresh STEP exports from CAD — makes it immediately useful rather than something that only benefits designers starting a new project from scratch. For a complex multi-part build like the Grinch project or the ongoing dual-BCMU series covered elsewhere on this site, being able to generate a proper PDF or video walkthrough directly from the same 3MF file that produced the print files, rather than reconstructing the assembly sequence from memory in a separate document, is a genuinely useful workflow improvement rather than a novelty feature.
The version landscape as it currently stands
For anyone deciding whether to update: 2.7.1 Public Release, which brought A2L support, Texture-to-Colour painting, and the Filament Manager into stable, arrived June 1, 2026, followed by a 2.7.1.62 maintenance build on June 16 that mainly addressed a macOS startup slowdown. The 2.8.0 Public Beta landed June 25 with the Assembly Guide and counterbore bridging features first appearing, and the update covered here — 2.8.2.60 — moves the assembly guide feature and Decompose Color into a stable public release rather than beta-only status, alongside the counterbore hole bridging improvement covered in the earlier post. If MakerWorld publishing is part of your workflow and you had been avoiding the beta specifically for that reason, this public release removes that obstacle.
Full credit again to Carolyn Schwaar and All3DP for the original coverage that prompted this post, and to Fabbaloo and 3Druck.com for the hands-on detail — particularly the “click Overview to find it” tip, which is exactly the kind of practical detail that a bare feature announcement never includes but that actually determines whether someone finds the tool useful on their first attempt or gives up looking for a button that was never where they expected it to be.



The clarification that Assembly Guides work on existing multi-part 3MF MakerWorld files (not only STEP/CAD imports) is the part that actually changes who this is for. I had treated the beta notes as a Fusion/SolidWorks pipeline feature and skipped it; once it landed in public 2.8.2.60 and the MakerWorld upload caveat dropped, I tried it on a pre-coloured multi-part 3MF and the explode + step annotations were immediately useful for handoff notes. Tip for finding the button: open the model in Prepare, look under the assembly / guide tools rather than the old paint panel — it is easy to miss if you are hunting under colour. Decompose Color is a nice companion for translucent layer blends, but it is a separate workflow from the guide tool. For multi-part kits I generate as printable STLs (luphra.com), being able to export a short assemble-this sequence in the same slicer as the print file is a real time saver.