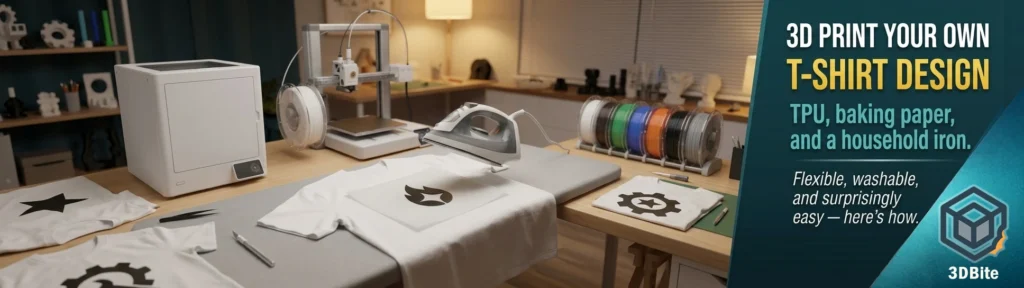
This one is on my list to try. I have not done it yet, but the research I have done ahead of giving it a go is interesting enough to be worth writing up in full now, partly because the method is genuinely more accessible than it sounds and partly because there are some important nuances — particularly around filament choice and technique — that are easy to get wrong and that the better resources handle very differently from each other. The basic concept: print a design in flexible TPU filament onto baking paper, then iron it onto a t-shirt. No heat transfer vinyl supplier required, no screen printing setup, no specialist equipment beyond the 3D printer you already have. Let us go through the whole thing properly.
Why TPU and not PLA
The filament choice matters enormously here and it is worth understanding the logic before touching the slicer. PLA is rigid at room temperature. A PLA design ironed onto a t-shirt will feel like wearing a piece of stiff plastic — it restricts movement, it does not flex with the fabric, and under repeated stretching and washing it peels away from the edges. PLA has been tested extensively for this application and the conclusions are consistent: PLA designs peeled far more readily than TPU, particularly around thinner areas, and the rigidity made them uncomfortable on anything that moved with the body.
TPU — thermoplastic polyurethane — is different in the ways that matter for this application. It is an elastomer: it bends, stretches, and returns to shape, which means a TPU design moves with the fabric rather than fighting it. More importantly, TPU bonds to fabric fibres in a way that PLA does not. When TPU is ironed or directly heated onto textile, it becomes tacky and the polymer works into the fibre structure, creating a mechanical lock that survives stretching and washing much more reliably than a PLA surface bond. Results are surprisingly good — after a 30°C wash cycle, most TPU designs held up well. PLA designs had sections peeling away, particularly in thinner areas.
There is one nuance the Prusa research blog raises that is worth understanding: TPU can blur when ironed, particularly with fine detail. The flexibility that makes it excellent on a t-shirt also means it can spread slightly under iron pressure, softening very fine lines and small text. PLA irons with more precision for extremely fine detail. The practical implication: for bold logos, clean text at a reasonable size, and solid icons, TPU is the correct choice. For extremely intricate filigree detail or very small text, PLA may produce a crisper transfer — at the cost of flexibility and long-term durability. For a t-shirt design that needs to survive regular wear and washing, TPU wins the trade-off.
The two approaches: iron-on versus direct printing
There are two fundamentally different techniques for getting a 3D-printed design onto fabric, and they have very different implications for setup, results, and risk.
Method 1: Iron-on transfer (recommended for Bambu machines)
Print the design onto baking parchment paper rather than directly onto the build plate. The TPU releases cleanly from baking paper once cool. You then position the print face-down on the shirt and iron it on through a protective layer. This is the method that works on any Bambu machine without modification — the A1, the A2L, the A1 Mini — because it does not require the printer to accommodate the physical t-shirt as a printing surface.
Method 2: Direct printing onto fabric
The more adventurous method: lay the fabric directly on the build plate and print onto it. If you want the print to be permanent, try printing flexible filament directly on the fabric. Increasing temperature by 15°C and flow to 120% will lead to great adhesion. If done properly, you will probably be unable to remove the print without damaging the clothes. This produces a more integrated bond — the TPU melts partially into the fibre weave rather than sitting on top of it — but it carries real risk. A nozzle dragged across a t-shirt at printing temperature can leave a hole. Bed levelling with a non-flat fabric surface introduces inconsistency. And any slicer mistake is printed permanently onto the garment before you can stop it.
This guide focuses primarily on the iron-on method — it is the one that works without modification on a Bambu A1 or A2L, and it is the safer starting point for a first attempt. The direct printing method is genuinely interesting and the Prusa documentation covers the specific insert technique that makes it work on bed-slinger printers, but it is not where you want to start when experimenting for the first time.
Design rules: what works and what does not
Getting the design right before printing is the single most impactful thing you can do to guarantee a good result. Several specific rules apply to 3D printed fabric transfers that do not apply to ordinary 3D printing.
All elements must be connected. An isolated island — a dot over an i, the counter of a letter O, a separate decorative element — will not transfer as a unit. It will stay on the baking paper or drift during placement. The design must be a single connected piece, which means letters need to be designed with bridges or stencil-style cuts rather than closed counters. Silhouette designs — a solid shape without internal cutouts — are the most reliable starting point for exactly this reason.
Simple, bold geometry prints and transfers cleanest. Icons, wordmarks in bold sans-serif fonts, logo shapes, simple illustrations — all of these work well. Complex gradient shading, photographic detail, or intricate linework pushes both the print capability and the iron-on precision harder than a first attempt warrants.
Mirror the design before slicing. This is the most commonly forgotten step and the one that produces the most visible failures. When you place the print face-down on the shirt and iron it, the design reads in reverse from the slicer orientation. If your design includes text or an asymmetric logo, mirror it in the slicer before printing so it reads correctly once transferred. Bambu Studio and OrcaSlicer both have a mirror function. This is not optional.
Keep designs within a printable flat area. The design must be flat — no overhangs, no dimensional height beyond the functional layer count. This is not structural printing. It is essentially a thin gasket of TPU that happens to be your design shape.
Slicer settings for the iron-on method on a Bambu A1
These are the settings that the community has found work well on Bambu A-series hardware specifically. The fundamental difference from standard TPU printing is that you are printing onto baking parchment paper rather than the build plate, and everything else follows from that.
| Setting | Value | Notes |
|---|---|---|
| Filament | TPU 95A | Standard shore 95A TPU — eSun, Sunlu, Bambu Lab TPU all documented to work. Do not use AMS for TPU — feed direct from external spool |
| Nozzle temperature | 225°C | Standard TPU range. Adjust by ±5°C for your specific brand if needed |
| Bed temperature | 45–60°C | Helps the baking paper stay flat and the TPU adhere temporarily during printing |
| Build surface | Baking parchment paper on the plate | Do NOT print TPU directly onto the smooth or textured PEI plate for this application — it will bond too aggressively. The paper is the release layer |
| Layer height | 0.2mm | Standard height works well. 2–4 layers total is the target for the finished design thickness |
| Total design thickness | 0.4–0.8mm (2–4 layers) | Thinner transfers are more flexible and feel more like commercial heat transfer on the garment. Thicker layers give more dimensional texture but can feel stiff |
| Print speed | 30mm/s outer wall, 40mm/s infill | TPU needs slow, consistent feeding. Do not use high speed settings |
| Infill | 100% | Solid infill for a design that is intended to be seen — gaps would show through as visual voids in the transfer |
| Supports | None | Not required for a flat design |
| Retraction | Minimal — 1mm at low speed | TPU and retraction are a classic combination for stringing issues. Low retraction with slow retraction speed is the correct approach |
| Cooling fan | 50–70% | More than you might use for functional TPU — the rapid cooling helps maintain the sharp edge of the design geometry on thin layers |
| AMS | Do not use | TPU does not feed reliably through the AMS Lite on the A1. Load TPU direct from the external spool holder and bypass the AMS entirely |
The iron-on process, step by step
This is the transfer process once the print is complete and cooled. Take time with each step — the transfer quality is determined here as much as it is in the slicer.
- Let the print cool completely before removing from the parchment paper. TPU remains slightly tacky when warm. A print removed too soon can distort. Give it ten minutes minimum on a flat surface before touching it.
- Pre-iron the shirt surface. Lay the shirt on a firm, flat ironing surface — not a soft ironing board if you can help it; a hard surface like a table with a thin folded towel produces more even pressure. Iron the area where the design will go until the fabric is smooth and warm. Any wrinkle under the transfer will be pressed permanently into the design.
- Position the print, design face-down. The print goes onto the shirt with the side that was touching the baking paper facing upward and the printed surface facing the fabric. If you have mirrored the design correctly in the slicer, it should now read correctly when you peek at the edge.
- Cover with a fresh piece of baking paper. This protects both the iron’s soleplate and the back of the print from direct contact. Do not iron directly onto the TPU — it will stick to the iron.
- Iron at maximum heat, no steam. Make sure there is no water in the iron. Steam introduces moisture that can interfere with the TPU-to-fabric bond. Maximum heat setting. Press firmly and hold for 30 seconds rather than moving the iron — you want consistent pressure and heat in one area rather than glancing across it.
- Lift and check. Carefully peel back one corner of the baking paper to see whether the TPU has bonded. If areas are still lifting, replace the paper and iron for another 15 seconds. The TPU should feel firmly attached to the fabric surface.
- Allow to cool under light pressure. Place a flat book or similar over the design area as it cools. This keeps the design from lifting at the edges as the TPU contracts slightly during cooling.
- Peel the baking paper away slowly. Once fully cool. The design stays on the shirt; the baking paper comes away cleanly. If any part of the design tries to follow the paper, replace it and re-iron that section before it fully cools.
Fabric choice: what works and what does not
Cotton and cotton-blend fabrics are the recommended starting point and the most documented. Cotton fibres have the surface texture and heat tolerance that creates the best mechanical bond with the TPU under ironing. A 100% cotton t-shirt is the easiest and most reliable surface for a first attempt.
Synthetic fabrics — polyester, moisture-wicking athletic material — are trickier. These can melt or distort at ironing temperatures before the TPU has bonded, and the smoother synthetic fibre surface gives the TPU less mechanical grip. This is the classic mistake with conventional heat transfer vinyl too: applying standard rigid HTV to a super-stretchy, moisture-wicking athletic shirt ends in disaster. The same applies here. Start with cotton. Experiment with synthetics only once you have a reliable method on natural fibres.
Thin, delicate fabrics and anything with a napped surface (velvet, certain jerseys) are not suitable. You need a flat, reasonably dense weave to give the TPU a surface to bond to under pressure.
Washing and care
The washing results from independent testing are clear: 30°C wash, the design side turned inside out, and no tumble drying with heat. The heat from a standard tumble drier can literally lift the transfer right off the shirt in the same way it can lift commercial HTV. Air dry or use the no-heat air fluff setting if a machine is unavoidable. One corner peeling after washing was tracked to insufficient ironing time during application — not a material failure — and re-ironing with the same baking paper technique re-bonds edges that have started to lift.
Never iron directly on the design once it is on the shirt. If the shirt needs ironing, turn it inside out and work around the design area. The same baking paper protective layer applies if you ever need to re-press the design itself.
Troubleshooting common problems
- Design not bonding cleanly — peeling at edges after cooling: insufficient ironing time or temperature. The TPU needs sustained heat at pressure, not a brief pass. Iron for longer and apply more direct downward pressure
- Fine detail blurring or spreading: this is the known TPU iron-on characteristic. Simplify the design to bolder elements, or try PLA for the finest detail elements (accepting the reduced flexibility trade-off), or switch to the direct printing method which avoids the ironing stage entirely
- Stringing in the print: reduce retraction distance, increase printing temperature slightly, and make sure the TPU is completely dry before printing. Wet TPU causes inconsistent flow that shows as stringing and blobs
- Design distorting or warping on the parchment paper after printing: allow longer cooling time before removal, and weight the design flat during cooling. Thin TPU sections can curl slightly as they cool
- Design pulling away from parchment during printing: increase bed temperature slightly or apply a very thin layer of PVA glue stick to the parchment surface before printing. The parchment should hold the design lightly during printing but release cleanly once cool
- Peeling after first wash: insufficient iron bonding during application is the most common cause. Re-iron the design through baking paper for a longer press time and allow it to cool under pressure
An interesting connection to the A2L’s cutter
Given that the A2L is now on the desk — and its blade cutting accessory, as covered in the full specs post, can cut vinyl and fabric — there is an interesting hybrid workflow here that I want to experiment with. A 3D-printed TPU design combined with a vinyl-cut border or frame, or cut fabric elements added to a printed base, could produce results that neither technique alone delivers. The A2L’s cutter is not something I have a use case for in standard printing, but in the context of garment customisation combining both printing and cutting, the vinyl cutter’s presence on the machine suddenly makes more sense to me than it did on announcement day. Watch this space on that one — if the TPU iron-on test goes well, the hybrid experiment is next.
Summary
The iron-on TPU method is genuinely accessible on any Bambu machine, requires no specialist equipment beyond what is already on the desk, and produces results that survive regular wear and washing when the technique is applied correctly. Print the mirrored design in TPU onto baking paper, slow and steady at around 30mm/s, two to four layers at 0.2mm. Transfer with a dry iron at maximum heat through protective parchment, pressed firmly for thirty seconds. Cotton fabric, no tumble drier heat, 30C wash.
The key decision is design simplicity. A clean connected silhouette or bold logo transfers reliably. Intricate detail and isolated islands do not. Start with the simplest design that says what you want it to say, get the method working on a test piece of fabric, and build from there. That is exactly the approach I am planning to take when this makes it to the top of the queue — and it will make it there soon.