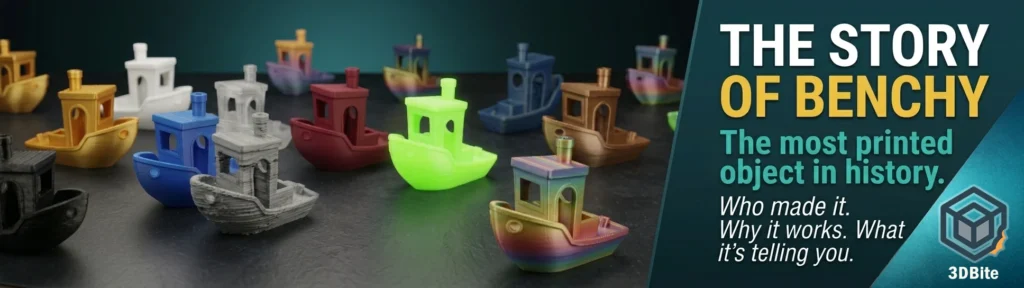
Somewhere in the world, right now, someone is printing a Benchy. It is the world’s most printed 3D model — a claim that sounds hyperbolic until you consider that virtually every 3D printer sold in the last decade has been tested with one. New printer owners print it within hours of their first successful bed adhesion. Experienced users print it when something starts behaving differently and they need a baseline. Manufacturers ship printers with it pre-sliced on the internal storage. Speed runners compete to print it as fast as physics allow. A tiny tugboat, 60mm long, has become the universal language of FDM printing. This is how that happened.
Who made it and why
The 3DBenchy is a 3D computer model specifically designed for testing the accuracy and capabilities of 3D printers. Its creators, Daniel Norée and Paulo Kiefe, described it as “the jolly 3D printing torture-test.” While working at Creative Tools, Daniel Norée designed the boat model as a benchmarking tool for 3D printers. Paulo Kiefe, CEO of Creative Tools until 2018, shared Norée’s enthusiasm for 3D printing, named the model “3DBenchy,” and established its online identity by uploading it to 3D printing repositories. It was released on 9 April 2015.
Creative Tools was a Swedish company that had become a leading reseller of desktop 3D printers in the Nordic countries. In 2015, desktop FDM printing was still genuinely difficult — layer separation, stringing, warping, and failed first layers were the norm rather than the exception. Every new printer required extensive tuning, and the calibration process was frustratingly inconsistent because there was no agreed standard for what a well-tuned printer should be able to produce.
Norée and the Creative Tools CAD team had been using a popular treefrog model as an informal test print — it exposed cooling performance issues because of the sloping geometry under its belly. Inspired by this, Daniel and I created our original 3D model while working at Creative Tools to share with the rapidly growing 3D printing community. Daniel had the brilliant idea of designing a boat where the hull would serve the same function as the frog’s belly. The boat’s shape also allowed us to add more measurable and challenging geometry. The boat concept was elegant: a hull gave them the organic curved overhang they needed to test cooling, and the nautical form gave them opportunities to add a cabin, windows, chimneys, a deck, an anchor hole, and embossed text — each one testing something different.
In early 2015, the CAD team at Creative Tools got the assignment to develop such a model. The task consisted of creating a single 3D file containing as many features as possible, including a variety of measurable geometric and organic shapes, to challenge the capabilities and reveal limitations of 3D printers. The design team at Creative Tools defined a set of criteria: the part should be easy to measure using a caliper tool, making the resulting dimensions valuable for calibrating the 3D printer hardware, firmware and the slicing software. Taking into account that design affects how an object is perceived, the team had the task to combine the shapes into something that anyone could easily recognise — and if possible, it should be “cute.” The boat was both instantly recognisable and immediately loveable. That was not an accident. It was a design requirement.
The name
The name “Benchy” is short for benchmark. The hashtag #3DBenchy was established from the beginning as part of the release strategy — the intent was always community adoption, and Kiefe’s decision to give the model an online identity with a consistent tag was the early social media thinking that helped it spread. The full tagline — “the jolly 3D printing torture-test” — captured both the friendly aesthetic and the technical intent simultaneously. It was a torture test wrapped in a characterful boat shape. The tension between “jolly” and “torture test” is a large part of why it became so culturally sticky.
What the Benchy actually tests
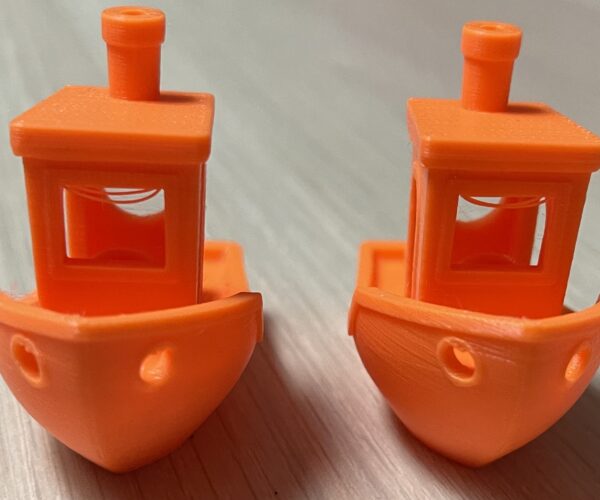
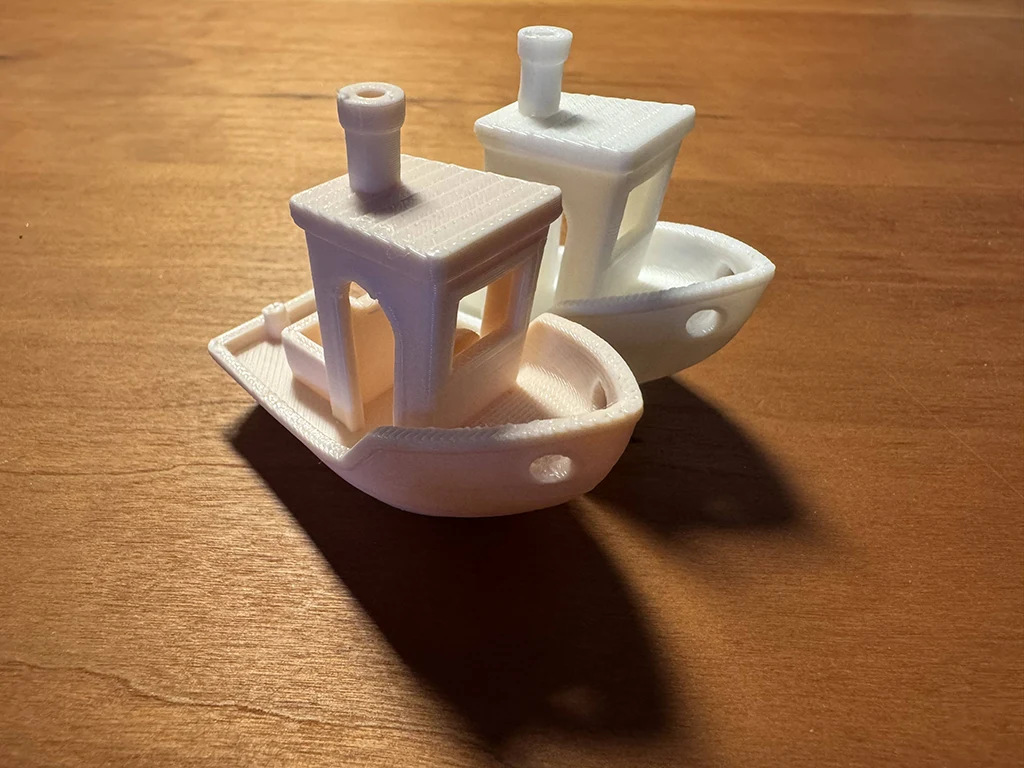
Every part of the Benchy is a deliberate test. This miniature boat manages to pack virtually every complex geometric feature you will ever come across into one compact print. Here is what each area of the model is actually doing.
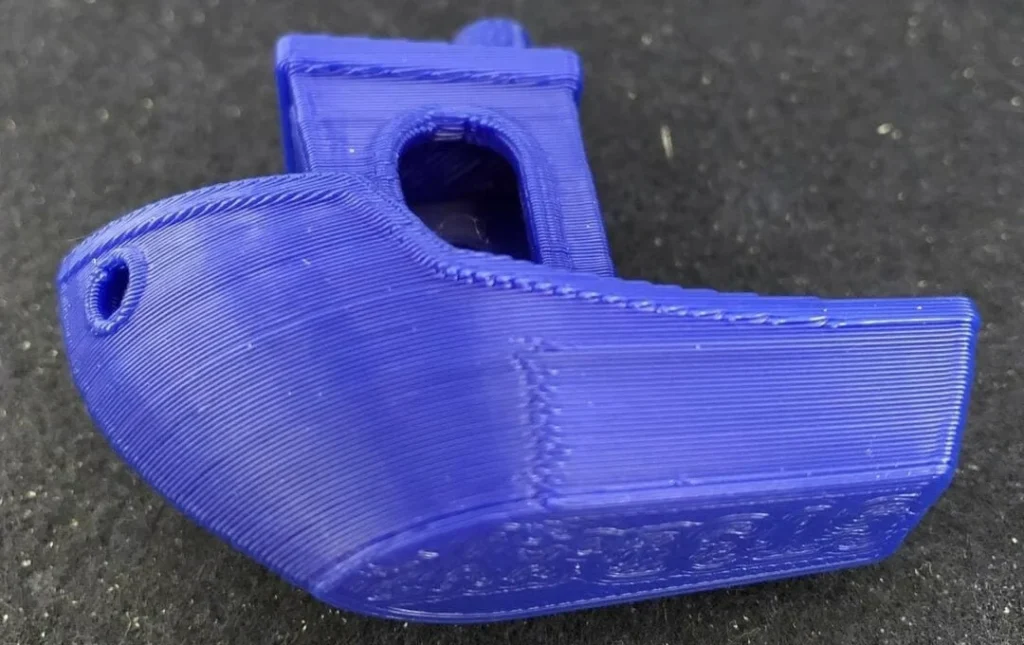
The hull — overhang and cooling performance
The curved hull is the original test from the treefrog that inspired the design. The steep curve of the bow and the arches of the cabin test your printer’s part cooling. For these features, a good result is a smooth, downward-curving surface with minimal sagging, curling, or messy lines on the underside. If you see drooping or stringy messes under the overhangs and bridges, it is a clear sign of insufficient cooling, meaning the filament didn’t solidify fast enough to hold its shape. The bow specifically presents a 40° overhang angle to the horizontal plane — not extreme enough to require supports on a well-tuned printer, but demanding enough to expose cooling deficiencies.
The cabin roof — bridging
The flat roof of the cabin is a bridge — the printer is depositing material across an open gap with nothing beneath it. The flat roof of the cabin, which is printed over open air, specifically tests bridging. A good result is a smooth, downward-curving surface with minimal sagging. The bridge roof of the Benchy is 23mm wide, which is a meaningful span for a standard 0.4mm nozzle. A well-calibrated printer bridges this cleanly with a single pass. Sagging, fuzzy texture on the underside, or a visible dip in the middle of the roof all indicate bridging settings that need attention.
The chimney — small perimeters and retraction
The small, cylindrical chimney and the fine details like the steering wheel test how well your 3D printer handles small perimeters and reproduces fine details. The chimney should be perfectly round with a clean vertical profile. The steering wheel should be distinct. The chimney has an inner diameter of just 3mm — small enough that retraction timing and cooling performance both affect whether it comes out round and clean or warped and blobby. A perfect chimney requires the printer to manage tiny loops without over-extruding on direction changes and without accumulating enough heat in a small area to distort the geometry.
The portholes and windows — fine detail and circles
The circular porthole on the stern has an inner diameter of 9mm and an outer diameter of 12mm. The rectangular front window measures 10.50 × 9.50 mm, with parallel inner surfaces horizontally cut into the bridge. Circles are demanding for FDM printers because they require constant direction changes. An imprecise motion system will produce slightly oval circles rather than round ones, and the porthole is sized specifically to make this defect visible to the eye and measurable with a caliper.
The stern text — surface detail and z-seam
The embossed “3DBenchy” text on the stern is a test of fine surface detail resolution. At standard print settings with a 0.4mm nozzle, the text is small enough to be challenging without being impossible. The quality of the text reveals how well the printer handles the seam between perimeter passes and how cleanly the extruder manages small starts and stops. The text also tends to reveal z-seam placement — where the printer starts and stops each layer perimeter — since the seam is most visible on a flat, prominently placed surface like the stern.
The deck and hull sides — surface finish and stringing
The broad flat sides of the hull and the top deck are the canvas on which ghosting, ringing, and surface inconsistency are most clearly visible. Ringing — the wavy pattern that appears after sharp direction changes at speed — is immediately apparent on the hull sides because they provide a large, smooth reference surface with no geometric distraction. The deck tests top surface quality and the consistency of the final layers over infill.
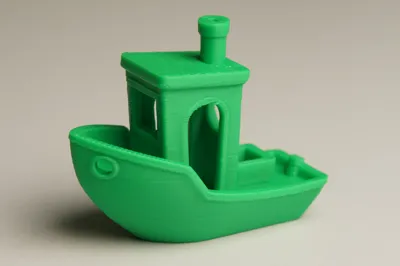
The dimensions — calibration accuracy
Every dimension of the Benchy is a round number specifically so it can be measured with calipers. The design has specific target measurements: overall length 60mm, width 31mm, height 48mm. Checking these with calipers allows for a direct test of the printer’s calibration. If the printed Benchy measures 59.2mm long instead of 60mm, the X-axis steps-per-millimetre needs adjustment. If the height is off, Z calibration is the culprit. The entire model functions as a dimensional reference piece as well as a visual quality check.
A critical note that the Benchy’s own official guidance makes explicit: a very common mistake beginners make is turning on auto-supports in their slicer when printing a Benchy. The entire purpose of the model is to torture-test your printer’s ability to handle extreme overhangs and bridges on its own. Print it without supports. That is not a setting to optimise for — it is the entire point of the test.
The complete diagnostic reference
| Feature | Nominal measurement | What it tests | Bad result indicates |
|---|---|---|---|
| Overall length | 60.00 mm | X-axis calibration | Steps/mm misconfigured |
| Overall width | 31.00 mm | Y-axis calibration | Steps/mm misconfigured |
| Overall height | 48.00 mm | Z-axis calibration | Layer height or steps misconfigured |
| Bow hull curvature | 40° overhang | Part cooling | Insufficient cooling, too fast, too hot |
| Cabin roof bridge | 23.00 mm span | Bridging performance | Cooling, bridge flow rate, fan settings |
| Chimney inner diameter | 3.00 mm | Small perimeter quality, retraction | Over-extrusion, poor retraction, heat creep |
| Stern porthole inner | 9.00 mm | Circle accuracy, motion system | Belt tension, motion system backlash |
| Front window | 10.50 × 9.50 mm | Dimensional accuracy, bridging | Miscalibration, sag |
| Hull sides | Smooth continuous curve | Surface finish, ringing/ghosting | Too fast, loose belts, resonance |
| Stern text | Legible at normal viewing distance | Fine detail, z-seam, retraction | Poor retraction, z-seam placement |
| First layer adhesion | Clean flat base | Bed levelling, first layer height | Poor levelling, z-offset incorrect |
How it became the universal standard
The Benchy’s adoption was not engineered by Creative Tools — it was organic, driven by the community, and faster than anyone expected. Within months of the April 2015 release, it was appearing on Thingiverse, Reddit, and early 3D printing forums as the go-to benchmark. For the team at Creative Tools, it has been a pleasant process to see how the community embraced the tiny boat which was initially just intended to be an internal testing tool and made it into a universal open 3D printing success.
Several factors compounded to accelerate adoption beyond any single well-designed model:
It was free. The CC licence made it immediately accessible on every platform with no cost barrier. It was characterful. A boat is more interesting than a cube. A torture test that produces something you actually want to keep on your desk is a more compelling product than a calibration block you bin after measuring it. It had a name. “Print a Benchy” became a phrase — you cannot say “print a calibration cube” with the same currency because there is no single canonical calibration cube. The Benchy’s name gave it identity. And it was sized right. At 60mm long with no supports required, it prints in under an hour on most machines and uses minimal filament. The cost of entry for a Benchy print is low enough that it is the sensible first test rather than a significant commitment.
The network effect sealed it. Once enough people were using Benchy as their reference print, the community built enormous documentation around it. Every common failure mode has a reference Benchy photo, a diagnosis, and a fix. When a new printer owner posts “my Benchy looks like this” with a photo, an experienced community member can identify the problem immediately because they have seen it hundreds of times. That diagnostic community infrastructure is inseparable from the model itself now — the Benchy and the collective knowledge around it are a single resource.
The adoption of #3DBenchy as a standard benchmarking part is also noticeable as the model is now shipped pre-sliced on several 3D printer models. Bambu Lab includes it on the internal storage of new machines. Anycubic ships it pre-sliced. Prusa has distributed it. A model designed as an internal testing tool by a Swedish 3D printing reseller became the default first print for an entire generation of printers worldwide. That is an extraordinary outcome for any single piece of design work.
The licence saga: from CC to public domain
The Benchy’s legal status was a quiet background story for years that became suddenly loud in early 2025. Released in 2015 under a Creative Commons: No Derivatives licence, the model’s design was protected from modifications, ensuring its effectiveness as a calibration tool. The No Derivatives condition meant remixes were technically not permitted — but for years nobody enforced it, and the community produced hundreds of modified versions: Benchys with Santa hats, low-poly Benchys, Benchy keyrings, multi-part colour Benchys, Benchy cookie cutters. All technically unlicensed. All generally tolerated.
When Creative Tools was acquired by NTI in 2024, NTI became the custodian of 3DBenchy. In January 2025, rumours surfaced that remixes of 3DBenchy were being removed from Printables due to the enforcement of the original licence. However, NTI did not initiate this action. Prusa Research, the company behind Printables, later confirmed that a third-party report — not NTI — prompted the enforcement.
The removal of community remixes — however technically justified by the licence — created exactly the kind of community backlash you would expect when a beloved ten-year-old community resource is suddenly being policed. The situation was resolved in the best possible way: marking its 10th anniversary, NTI’s move to eliminate usage restrictions reinforces the model’s role as a standardised tool for the 3D printing community — 3DBenchy has been transitioned into the public domain. The Benchy is now entirely free in every sense. No licence restrictions, no derivative limits, no corporate owner with an interest in monetising it. It belongs to everyone.
Speed Benchy: the competition nobody officially runs
The Speed Benchy challenge has its own rules, its own community, and its own culture. The challenge is simple: print a Benchy as fast as possible while following a specific set of rules — no scaling, no supports, standard orientation, standard slicer settings. The results range from barely recognisable at sub-5-minute speeds to impressively clean at the 10–15 minute range on modern machines.
As covered in the Nintendo Switch and Klipper post, Cocoanix completed a Speed Benchy in 8 minutes and 41 seconds using a jailbroken Switch running Klipper on a Prusa MK3S — a machine that previously completed the same print in 90 minutes. Instead of taking 90 minutes to output the famous standard 3DBenchy tugboat model, the Nvidia-accelerated MK3S took a brisk sub-nine minutes. The Speed Benchy is now the benchmark of benchmarks — using the standard benchmark to measure not print quality but the maximum performance envelope of the hardware and firmware combination.
The Speed Benchy community has documented print times from under 3 minutes on aggressively tuned machines — at those speeds the result looks alarming and the quality is essentially meaningless as a calibration reference. The value is not the output; it is what the attempt reveals about the machine’s maximum capability. It is drag racing with a tiny tugboat.
Has the Benchy aged well?
An honest answer: mostly yes, but with caveats. The Benchy was designed in 2015 for the printers of 2015. Printers just have become really good with these features that a Benchy isn’t much of a challenge here anymore. The overhang is actually one of the areas where I don’t think it does a particularly good job — not much of a challenge for modern machines. A Bambu A1 printing at standard settings will produce a clean Benchy in roughly fifteen minutes without any meaningful challenge. The overhangs are handled effortlessly. The bridging is unremarkable. The chimney is a minor test rather than an indicator of whether the printer is well-tuned.
What the Benchy still does well on modern machines is surface quality assessment. The hull sides remain the best available canvas for identifying ringing, ghosting, and vibration artefacts. The dimensional measurements remain a valid calibration check. And the chimney — small as it is — still reveals retraction and cooling problems that matter for fine-detail printing. It has not become irrelevant; it has become less of a torture test and more of a confidence check. On a modern machine, a clean Benchy tells you the printer is working correctly. On an older machine or after a change to settings or hardware, it still tells you whether something has gone wrong.
Historically, this was considered a “quick one-hour print.” Fast forward to today’s modern CoreXY machines, and you can comfortably crank out a near-perfect Benchy in 15 to 30 minutes. This means you can easily print, evaluate, tweak your slicer settings, and repeat in rapid succession. That is the most practically relevant evolution — the Benchy is no longer a significant time commitment, which makes it even more useful as a quick diagnostic tool. Fifteen minutes to run a baseline check is not a meaningful cost in any printing session.
Trivia worth knowing
- The Benchy is believed to be the most 3D printed object in history — it has been used as a benchmark object for virtually every 3D printer on the planet, from large-format devices down to microscopic 3D printers.
- A multi-part, multi-colour version of the Benchy was released in July 2015, just three months after the original — the multi-colour variant exists alongside the original and is used for colour transition and AMS testing
- The model has been printed at microscopic scale — under 1mm — and at enormous scale on large-format industrial machines. The geometry scales correctly at any size
- Bambu Lab includes the Benchy pre-sliced in the internal storage of their printers. It is often the first thing a new Bambu owner prints, often without knowing the model’s history
- The original CC No-Derivatives licence was why the word “Benchy” in the title was spelled with a capital B and a hashtag — the naming conventions were established deliberately to create a searchable identity on social platforms
- NTI, the company that inherited the Benchy from Creative Tools, is a construction and media software company with no connection to 3D printing. They released it to the public domain specifically because they had no use for it commercially and the community clearly did
- Daniel Norée went on to create STEMFIE — a free, open-source, 3D printable educational toy system — continuing the same spirit of designing for the community
Summary
A Swedish 3D printing reseller needed a better way to help customers calibrate their machines. A designer named Daniel Norée had the idea of building the calibration requirements into a boat because a boat could carry every challenging geometric feature in a single recognisable form. His CEO named it after the word “benchmark” and gave it a hashtag. The community adopted it immediately, documented every failure mode, built a Speed Benchy competition around it, and produced hundreds of derivatives. A corporate acquisition created a brief licensing scare that resolved into the Benchy becoming fully public domain on its tenth birthday.
It is 60mm long. It weighs a few grams. It takes fifteen minutes on a modern machine. And it has been printed more times than any other 3D model in history. Not bad for an internal testing tool that was never supposed to go anywhere.